Showing posts with label 3D Studio Max Tutorial. Show all posts

Tuesday, 21 February 2012

Stage 10: Add Play Equipment, Vehicles and People


Introduction

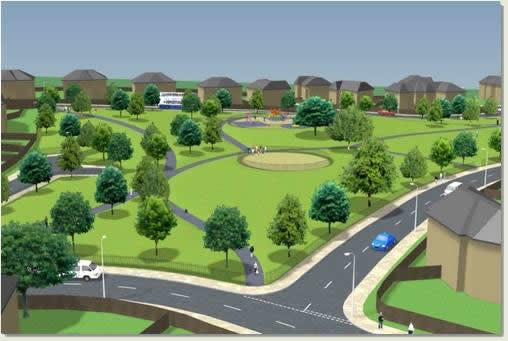
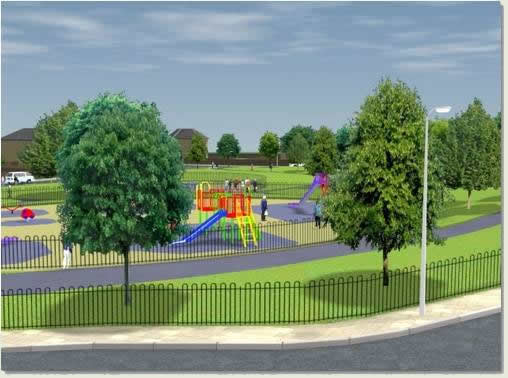
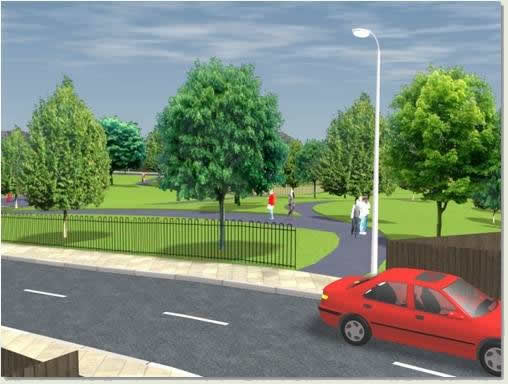
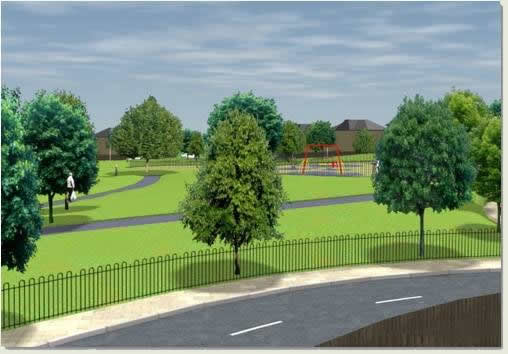
Finally, Key 3D Model Objects dialog is used to add play equipment, cars and vans and Key 3D Image Objects dialog is used to add people. This brings the scene to life and further adds to the sense of scale for the design

Download Sample Data

In order to follow this tutorial, you may want to use the supplied files. Please read the sample data instructions before downloading.
AutoCAD Drawing files: dwg_files.zip (784kb)
3ds Max Scene files: scene_files (7.8mb)


10.1 Play Equipment

  • Carry on from the previous scene or open ACAD to 3D Stage 10.max
  • Open Key 3D Model Objects dialog and Browse to Playground / Record
  • In the Top viewport Drop playground equipment onto the rubber safety surfaces

  • Rotate the play equipment on the Z axis so that they are orientated correctly


10.2 Cars and vans

  • In Key 3D Model Objects dialog Browse to xtra Vehicles / Cars
  • In the Top viewport Drop Car 02 high res red or similar onto the road surface

  • Rotate the car on the Z axis so that it faces the correct way
  • Open Key 3D Drop Onto 
  • Check Follow Surface Normal and then press Position and Drop. The button turns orange
  • In the Top viewport move the cross cursor and drop the car slightly further up the road
  • Right click to stop the drop routine
This will ensure that the car follows the surface of the road


  • Use the same routine to drop and position a further six cars and two vans


10.3 People

To drop single Image Object people on surfaces
  • Open Key 3D Image Objects dialog and Browse to People / Casual Standing
  • Select a thumbnail image

  • Press Drop and in the Top viewport left click to drop the Image Object on a surface

To drop multiple Image Objects on surfaces

  • In Key 3D Image Objects dialog press Browse and select People / Crowds
  • In the Top viewport drop the Image Objects onto surfaces. This option drops different images each time the left mouse button is pressed

To generate crowds automatically

Use Key 3D Spline Filler to generate crowds automatically:
  • Draw a spline in the Top viewport delineating where a crowd of people is required
  • Create a small Box with minimum segments as a 'Fill' object

  • Open Key 3D Spline Filler and select the spline
  • Under Spline to Fill press Selected. The name Line01 is displayed
  • Select the box
  • Under Fill Object press Selected. The name Box01 is displayed
  • Press Fill
  • If the fill number or randomisation is not suitable press Undo. Change the number and press Fill again

The spline is filled with 'Fill' objects

  • Open Key 3D Straight to Surface and select all the boxes
  • Press Move and in the User viewport see the boxes move to the surface


  • Open Key 3D Image Objects dialog and select People / Crowds / Crowd cas stand & walk
  • Press Settings and randomise the height and width by about 10% up and down
  • Select all the boxes and press Replace. This replaces all the box 'Fill' objects with randomised people Image Objects

  • Finally open Key 3D Image Object Settings
  • Select All
  • Press Look At Camera and then Add Shadows

Basics of Animation 3

Toolbar
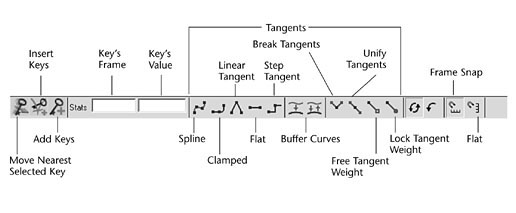
The toolbar  gives you quick access to functions for modifying animation curves and keys.

Fig 7-7 Toolbar
Buffer curves Use Buffer Curve snapshot and swap Buffer curves to compare changes to the current animation curve with its previous shape.
Break Tangents Allows manipulation of the in and out tangent handles individually so you can edit the curve segment entering the key without affecting its opposite handle.
Unify Tangents  causes the manipulation of an in or out tangent handle to affect its opposite handle equally. It retains the relative position of the tangent handles even after tangents are individually adjusted.
Lock Tangent Weight specifies that when you move a tangent ,only its angle can be changed.
Free Tangent Weight specifies that when you move a tangent ,only its angle can be changed. This allows the weight of a tangent to be adjusted as well as the angle.
Clamped  tangent creates an animation curve that has the characteristics of linear and spline curves. The key's tangents will be spline unless the value of two adjacent keys are very close.
Step tangent creates an animation curve whose out tangent is a flat curve.
Flat Sets the in and out tangents of the key to be horizontal.

The Dope Sheet

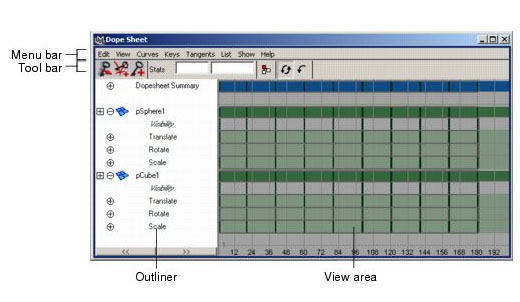
The Dope Sheet is another animation editor in Maya that is similar to the Graph  Editor.  Instead of displaying curves, the Dope Sheet displays key times as colored rectangles and lets you edit event timing in blocks of keyframes and synchronize motion to a sound file.

To open the Dope Sheet

Select Window > Animation Editors > Dope Sheet

Fig7-8 Dope sheet editor

To Place the Dope Sheet in a View

Select the view.
Select Panels > Panel > Dope Sheet.

Monday, 20 February 2012

Stage 11: Rendering


Introduction

In this final stage of the project, views created with the Key 3D View Manager are rendered using Supersampling for best quality.

Download Sample Data

In order to follow this tutorial, you may want to use the supplied files. Please read the sample data instructions before downloading.
AutoCAD Drawing files: dwg_files.zip (784kb)
3ds Max Scene files: scene_files (7.8mb)


  • Carry on from the previous scene or open ACAD to 3D Stage 11.max
  • Use Key 3D View Manager to set up further views and render:
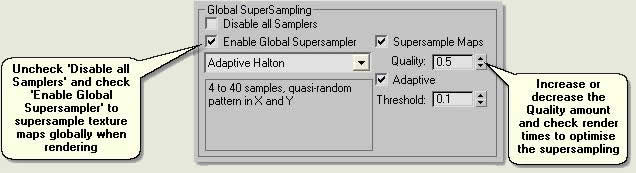
TIP: When performing final renders use Supersampling to increase the quality of mapped textures in the scene.Supersampling is an optional additional anti-aliasing step that provides a "best guess" color for each rendered pixel. The supersampler's output is then passed on to the renderer, which performs a final antialiasing pass. This scene relies on many image maps and textures and will benefit from 'global supersampling' (ie on all texture maps in the scene). To enable global supersampling do the following:
  • Rendering> Render Scene dialog > Renderer Tab > Global SuperSampling
  • Uncheck Disable all Samplers and check Enable Global Supersampler to supersample texture maps when rendering
  • Increase or decrease the Quality amount (by 0.1 increments) and check render times and image quality to optimise the supersampling

TIP: When performing draft renders check Disable all Samplers to save render time

Overview East

Overview West

From 32 Chestnut Drive

From 54 Chestnut Drive 

From Ash Grove

From 12 Ash Grove

3ds Max Shortcut Keys

Open File CTRL+O (letter "o")
Save File CTRL+S
Redo Scene Operation CTRL+Y
Undo Scene Operation CTRL+Z
Delete Objects DELETE
Top View T
Bottom View B
Left View L
Front View F
Camera View C
Isometric User View U
Maximize Viewport Toggle ALT+W
Wireframe / Smooth Toggle F3
Material Editor M
Expert Mode CTRL+X
Show Tab Panel Toggle Y
Hide Cameras Toggle SHIFT+C
Hide Lights Toggle SHIFT+L
Hide Grids Toggle G
Go to End Frame END
Go to Start Frame HOME
Forward Time One Unit . (period)
Back Time One Unit , (comma)
Play Animation / (forward slash)
Auto Key Toggle N
Render Last F9
Render Scene F10
Select All CTRL+A
Select Invert CTRL+I (letter ???i???)
Select None CTRL+D
Select-By-Name Dialog H
Select Q
Move W
Rotate E
Scale R
Transform Gizmo Toggle X
Transform Type-In Dialog F12
Align ALT+A
Zoom Extents Selected All Z
Zoom Region Mode CTRL+W
Zoom Viewport In [ (open square bracket)
Zoom Viewport Out ] (closed square bracket