Shading Map Attributes
Represents a color map you apply to surfaces after they are rendered.The shading map material is useful for creating non-photorealistic effects(cartoon shading)or to highlight threshold values in a rendered image.
Surfaces Shader Attributes
A wrapper node, meaning you can connect any keyable attribute to this shading group and then connect the shading group to an object.
Use Background
You use it to set the object's Matte channel to 1 or 0, or create a matte for shadows and reflections on the surface. This material applies the same color as the objects in the background image to stand -in-surfaces.
Texture Mapping
Normally, a texture refers to applying a 2D image around a 3D surface, rather like wallpapering a curvy surface. Because a 2D image can be stretched, wrapped, and projected onto a surface in many different ways.
For polygon surfaces, mapping is normally applied by projecting 2D maps across the 3D surface in one of several ways: planar, cylindrical, spherical, and a special method called automatic mapping.
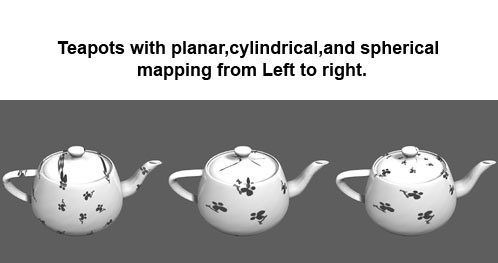
Fig 5-4 Mapping projection
Procedural Maps
In addition to applying an image or movie to a surface, Maya has other texture types called procedural textures. Many patterns, such as bricks, tiles, and gradients, are so repetitive that they can easily be represented by an equation. By using special forms of seemingly random values, many natural effects can be simulated mathematically: Marble, leather, water, granite, and many other complex and random textures are included with Maya as procedurals.
Maya's procedural textures come in two varieties: 2D and 3D. You can think of the 2D procedurals as a calculated form of a bitmap.When 3D procedurals are applied, however, they exist throughout 3D space, and object surfaces define where you see the texture. It's like carving the object from a block of the material.Procedural textures have several benefits. Because they are formula based, their parameters can be adjusted to instantly synthesize all kinds of different effects.
Assigning material to surfaces
The following lists a few quick ways to assign a material to a surface.
Represents a color map you apply to surfaces after they are rendered.The shading map material is useful for creating non-photorealistic effects(cartoon shading)or to highlight threshold values in a rendered image.
Shading Map Color
Defines the color of the material. The default is gray.Shader
You can map any material to the shading Map material.Surfaces Shader Attributes
A wrapper node, meaning you can connect any keyable attribute to this shading group and then connect the shading group to an object.
Out color
The color of the material .The default is black.Out Transparency
The transparency of the material. The default is black.Out Glow Color
The glow color of the material. The default is black, without glow.Use Background
You use it to set the object's Matte channel to 1 or 0, or create a matte for shadows and reflections on the surface. This material applies the same color as the objects in the background image to stand -in-surfaces.
Attributes
Adjust the Use Background material's to the light ,shadows, reflections and the geometry placement in the scene.Texture Mapping
Normally, a texture refers to applying a 2D image around a 3D surface, rather like wallpapering a curvy surface. Because a 2D image can be stretched, wrapped, and projected onto a surface in many different ways.
Mapping Coordinates
Mapping coordinates, also known as UV coordinates. For NURBS, parametric mapping is inherent to the surface and this is typically what's used. Parametric mapping is the 0 to 1 coordinate system that NURBS uses to map textures across its surfaces. It makes sure that the textures stay mapped to the surface like a decal, even if the geometry is deformed.For polygon surfaces, mapping is normally applied by projecting 2D maps across the 3D surface in one of several ways: planar, cylindrical, spherical, and a special method called automatic mapping.
Fig 5-4 Mapping projection
Procedural Maps
In addition to applying an image or movie to a surface, Maya has other texture types called procedural textures. Many patterns, such as bricks, tiles, and gradients, are so repetitive that they can easily be represented by an equation. By using special forms of seemingly random values, many natural effects can be simulated mathematically: Marble, leather, water, granite, and many other complex and random textures are included with Maya as procedurals.
Maya's procedural textures come in two varieties: 2D and 3D. You can think of the 2D procedurals as a calculated form of a bitmap.When 3D procedurals are applied, however, they exist throughout 3D space, and object surfaces define where you see the texture. It's like carving the object from a block of the material.Procedural textures have several benefits. Because they are formula based, their parameters can be adjusted to instantly synthesize all kinds of different effects.
2D Procedurals
Maya's 2D procedurals can be divided into two categories: regular patterns and noise patterns. The regular patterns include Grid, Checker, Bulge, Cloth, and Ramp. With these patterns, you can create tiles, bricks, and many other man-made repeating effects. Noise patterns include Fractal, Mountain, Noise, and Water. These psuedorandom textures are excellent for creating the complex "dirty" surfaces common in nature.3D Procedurals
All the 3D procedurals but snow are random types. Some, such as wood and marble, clearly imitate nature. However, all are excellent for synthesizing random effects.Assigning material to surfaces
The following lists a few quick ways to assign a material to a surface.
- In the view,select the surface to which you want to assign the material.
- From Hypershade, MMB-drag the material swatch over the selected surfaces.
- In the view ,shift-select the object to which you want to assign the material and in hypershade,click the material swatch.
- While the cursor is over the material swatch in hypershade,RMB -click-drag to select assign material to selection from the pop-up menu.
- MMB-drag and drop a Hypershade swatch onto an object in the IPR Render view.
To apply a material to several surfaces from with Hypershade
- Select the surfaces in a view.
- In Hypershade,RMB-click over the material swatch and select Assign material to selection from the pop-up menu.
To apply a material to a group of faces on a polygonal surface
- Select the surface.
- Press the RMB while over the surface,select face from the marking menu,then choose the select by component type icon.
- Select the face you want to map.
- While the faces are highlighted in the view, in hypershade,LMB-shift-click over the material swatch you want and press theRMB and select Assign material to selection from the pop-up menu.


0 comments:
Post a Comment