mWhen Maya starts, you have four cameras by default: front, side, top and perspective. Three of them are orthographic—flat, non-perspective views—and have visible icons you can use to translate or rotate the camera. The icon for the perspective camera is, by default, invisible. These four cameras are utility views that assist you in modeling and laying out your scene. When you're ready to pick the final rendered viewpoint of your scene, you should create a scene camera. If you're shooting a series of stills, you can create many cameras, one for each shot.
The camera placement determines exactly what will be seen and is used to frame specific portions of the scene, in the same way illustrators or photographers use composition to frame certain elements in their paintings and drawings. Other key variables for cameras are focal length, rotation (orientation), and angle of view. Focal length is directly linked to angle of view; if one goes up, the other goes down. With angle of view, as the angle of the lens widens, you must move the camera closer to the subject to keep it at the same relative size in the frame. The wider the angle, the higher the value for the Angle of View setting.
Creating Cameras
Create > Cameras > Camera
There are three types of perspective cameras in Maya. As with Maya's lights, you can change a camera to any other camera type in the Attribute Editor.
Camera
With this camera type, you see only the camera icon. In general, because this camera freely rotates and loses track of its "up" vector, you should use it only when you're linking the camera to another object for movement and animation, or when you're placing a camera in one fixed spot.
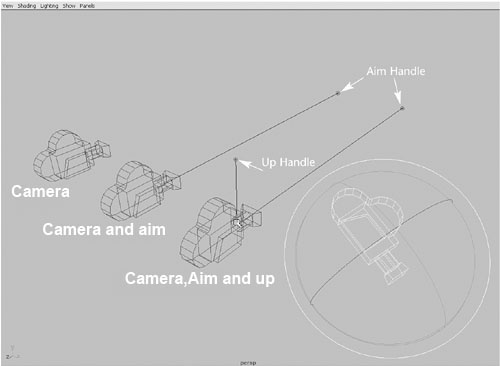
Fig6-1 Camera types
Camera Settings
These are the key settings for cameras under the Camera Attributes section:
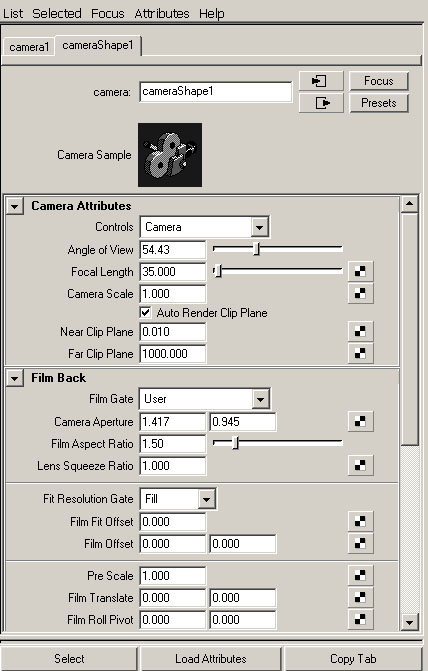
Fig 6_2 Camera Attributes
Controls In this drop-down list, you can quickly select the camera type you want.
Angle of View and Focal Length Controls the amount of perspective exaggeration. Raising the Angle of View attribute lowers the Focal Length attribute.
Camera Scale You can change the camera size in relation to your scene, which affects scene objects when you render. Camera Scale is like a multiplier for the Angle of View setting. For example, decreasing Camera Scale to .5 halves the camera's view area, but makes objects in the scene look twice as large.
Clip Planes Only objects located within the values specified for the camera's clip planes appear in the scene. If distant objects are not showing up in your scene, raise the Far Clip Plane value. If nearby objects seem to be appearing in cross-section or not appearing at all, lower the Near Clip Plane value.
Depth of Field Enable distance blur with this attribute. It can be a render-intensive effect, but yields a nice cinematic result because objects close to and far away from the focus point are progressively blurred.
Background Color The background fill color for images rendered from this camera; you can also use this section of the Attribute Editor to add an image or shader as the background.
Orthographic Views Switches the camera to an orthographic view. You can create perspective cameras, rotate them into position, and then set them to orthographic to get a "flat" view for projecting textures onto an object.
Animating the Camera
When you first begin animating the camera, it helps to follow the rules of videography, such as avoiding jarring camera motions—rapid pans, zooms, or rotations of the camera. In addition, you should usually give the camera the impression of having mass. The virtual camera, by default, starts and stops moving instantly, which looks unrealistic and abrupt to viewers. To avoid this problem, adjust the tangents for the camera position's start and stop keys in the Graph Editor so that motion begins and ends gradually . Do the same for the camera's aim point keys and any other animated camera attributes
The camera placement determines exactly what will be seen and is used to frame specific portions of the scene, in the same way illustrators or photographers use composition to frame certain elements in their paintings and drawings. Other key variables for cameras are focal length, rotation (orientation), and angle of view. Focal length is directly linked to angle of view; if one goes up, the other goes down. With angle of view, as the angle of the lens widens, you must move the camera closer to the subject to keep it at the same relative size in the frame. The wider the angle, the higher the value for the Angle of View setting.
Creating Cameras
Create > Cameras > Camera
There are three types of perspective cameras in Maya. As with Maya's lights, you can change a camera to any other camera type in the Attribute Editor.
Camera
With this camera type, you see only the camera icon. In general, because this camera freely rotates and loses track of its "up" vector, you should use it only when you're linking the camera to another object for movement and animation, or when you're placing a camera in one fixed spot.
Camera and Aim
This camera includes a camera target and an aim handle for adjusting the camera target. In addition, this camera automatically stays level in relation to the horizon, so it's the one you'll use most often. You can make this camera roll if you want, but by default, it stays level except at extreme straight-up or straight-down orientations.Camera, Aim and Up
This camera type includes two handles: the aim handle, described for Camera and Aim, and an up handle for banking (leveling) the camera. This camera type is useful when you want to bank the camera during your animation.Fig6-1 Camera types
Camera Settings
These are the key settings for cameras under the Camera Attributes section:
Fig 6_2 Camera Attributes
Controls In this drop-down list, you can quickly select the camera type you want.
Angle of View and Focal Length Controls the amount of perspective exaggeration. Raising the Angle of View attribute lowers the Focal Length attribute.
Camera Scale You can change the camera size in relation to your scene, which affects scene objects when you render. Camera Scale is like a multiplier for the Angle of View setting. For example, decreasing Camera Scale to .5 halves the camera's view area, but makes objects in the scene look twice as large.
Clip Planes Only objects located within the values specified for the camera's clip planes appear in the scene. If distant objects are not showing up in your scene, raise the Far Clip Plane value. If nearby objects seem to be appearing in cross-section or not appearing at all, lower the Near Clip Plane value.
Depth of Field Enable distance blur with this attribute. It can be a render-intensive effect, but yields a nice cinematic result because objects close to and far away from the focus point are progressively blurred.
Background Color The background fill color for images rendered from this camera; you can also use this section of the Attribute Editor to add an image or shader as the background.
Orthographic Views Switches the camera to an orthographic view. You can create perspective cameras, rotate them into position, and then set them to orthographic to get a "flat" view for projecting textures onto an object.
Animating the Camera
When you first begin animating the camera, it helps to follow the rules of videography, such as avoiding jarring camera motions—rapid pans, zooms, or rotations of the camera. In addition, you should usually give the camera the impression of having mass. The virtual camera, by default, starts and stops moving instantly, which looks unrealistic and abrupt to viewers. To avoid this problem, adjust the tangents for the camera position's start and stop keys in the Graph Editor so that motion begins and ends gradually . Do the same for the camera's aim point keys and any other animated camera attributes


0 comments:
Post a Comment