 In this tutorial, we're going to learn 3D Lingo, including:
- creation of textures, shaders, cameras and their associated properties
- how to control a camera and move around a 3D space
- collision detection using modelsUnderRay- creation and use of skyboxes / cubic VRs
The bulk of the tutorial is Lingo. This Lingo is explained through comments in the scripts as well text text between segments of the code.
Before we get stuck into the Lingo, let's look at some background to Cubic VRs and Skyboxes. Cubic VRs are also known as skyboxes, particularly in the gaming circles. The technical term for a skybox is a cubic environmental map or cubic reflection map. They have been around for years as a way to work out reflections when rendering objects in programs like 3DS Max. Skyboxes are used by Apple's QuickTime VR and other panorama technology.
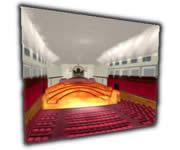
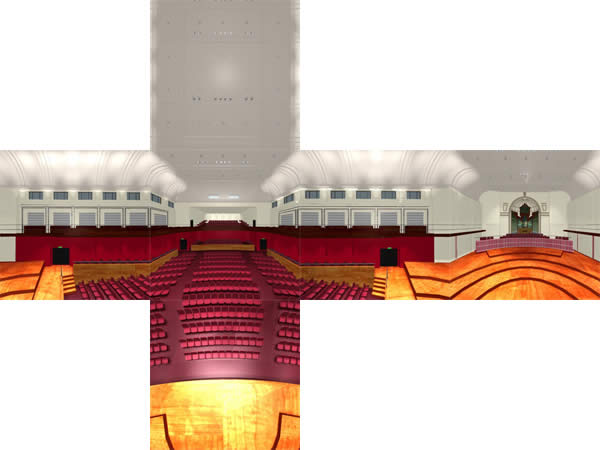 Skyboxes are made up of 6 images with the camera rotated at 90 degrees between each image as seen in the image to the left. Each segment is square and represents a face of the space - front, back, left, right, top and bottom.
Click on the image on the left to see a larger view.
The field of view also determines the most suitable resolution. The field of view is the vertical viewing angle property of a camera - i.e. the angle formed by two rays, one drawn from the camera to the top of the projection plane, the other drawn from the camera to the bottom of the projection plane. The field of view can be set by Lingo as we will see later. Common field of views are 60, 75, 90. Popular first-person shoot type games like Quake, have a field of view of 90.
Before you start, download the following images boxFront, boxRight, boxBack, boxLeft, boxUp, boxDown in the ZIP here, which will form our cubicVR world. You can see the finished tutorial here.
Setting up the Cube
1. Download the images and import them into a new movie.
1. Download the images and import them into a new movie.
2. We'll start with the easy scripting. In frame 5 of the scripting channel, create a pause frame behavior as follows:
on exitFrame go the frameend
3. Create a new shockwave 3D cast member. This can be simply down by opening the Shockwave 3D window then entering a name at the top. Name the 3D cast 3Dworld.
4. Place the 3Dworld member in the Score in sprite channel 1, extending over frames 1 to 5.
5. Create a new behavior attached to the 3D sprite and call it cubic environment setup. This, as the name implies, sets up the cube for our 3D world. Enter the following in the script:
property p3Dmember -- reference to the 3D memberproperty pCamera -- reference to camera
on beginSprite me
-- initiate properties and resetWorld p3Dmember = sprite(me.spriteNum).member
p3Dmember.resetWorld() pCamera= sprite(me.spriteNum).camera
p3Dmember.resetWorld() pCamera= sprite(me.spriteNum).camera
-------------------------
Next, we define properties for the camera starting with the fieldOfView (vertical viewing angle of the camera). If using Director 8.5, use projectionAngle (now obsolete Lingo) instead of fieldOfView. fieldOfView is also used for QTVR.
-- camera properties
Next, we define properties for the camera starting with the fieldOfView (vertical viewing angle of the camera). If using Director 8.5, use projectionAngle (now obsolete Lingo) instead of fieldOfView. fieldOfView is also used for QTVR.
-- camera properties
-- set up the camera's vertical viewing angle pCamera.fieldOfView = 90
-- position the camera pCamera.transform.position = vector(0,0,0)
-- rotate the camera to point forward along the Z -- axis
pCamera.pointAt(vector(0,0,-100))
-- rotate the camera to point forward along the Z -- axis
pCamera.pointAt(vector(0,0,-100))
--------------------------
-- create a cube with dimensions 256 x 256 x 256
-- create cube model resource boxRes = \
p3Dmember.newModelResource("boxRes",#box,#back)
boxRes.width = 256
boxRes.height = 256
boxRes.length = 256
-- create a cube model from the model resource boxMod = p3Dmember.newModel("boxMod",boxRes)
-- create cube model resource boxRes = \
p3Dmember.newModelResource("boxRes",#box,#back)
boxRes.width = 256
boxRes.height = 256
boxRes.length = 256
-- create a cube model from the model resource boxMod = p3Dmember.newModel("boxMod",boxRes)
-------------------------
-- create textures and shaders for faces of cube
-- create a list that contains all the image cast -- members that will form the faces of the box boxFaceNames = \
["boxFront","boxRight","boxBack","boxLeft",\"boxUp","boxDown"]
-- set up an empty list for the textures and shaders boxTextureList = [] -- stores textures for each face boxShaderList = [] -- stores shaders for each face
-- create a new texture and shader for each of the 6 -- faces of the box
repeat with side = 1 to 6
-- create texture and add to texture list boxTextureList[side] = p3Dmember.newTexture \("boxTexture"&side,#fromCastMember,member(boxFaceNames[side]))
-- set texture properties boxTextureList[side].nearFiltering = 1
boxTextureList[side].renderFormat = #rgba8880
boxTextureList[side].quality = #high
The nearFiltering property enables bilinear filtering, which smoothes any errors across the texture and thereby improves the texture's appearance, particularly if the image is rendered larger than the map.
The renderFormat property specifies the colour depth for each pixel, with each digit indicating the color depth being used for red, green, blue, and alpha. Since our image is a 24 bit image with no alpha, rgb8880 will give the best quality
The quality property allows the control over the level of mipmapping. This is where several versions of a texture image (smaller than the original) are saved and the 3D Xtra uses whichever is closest to the current size of the model. Trilinear mipmapping (#high) is the highest quality but the biggest in memory size. Mipmapping resamples the image to improve the texture appearance, but is unlike filtering which spreads errors across the image so they are less concentrated.
Common map sizes are 256 x 256 and 512 x 512. For best results, textures should be made with pixel dimensions that are to the power of 2 for height and width: e.g. 8, 16, 32, 64, 128, 256, 512. The shockwave 3D engine will stretch bitmaps to the nearest appropriate dimension and can distort the texture somewhat in the process.
-- create a shader and add it to the shader list -- we created (not to be confused with shaderList
-- property) boxShaderList[side] = \
p3Dmember.newShader("boxShader"&side,#standard)
-- set shader properties boxShaderList[side].emissive = rgb(255, 255, 255)
boxShaderList[side].ambient = rgb(0, 0, 0)
boxShaderList[side].diffuse = rgb(0, 0, 0)
boxShaderList[side].specular = rgb(0, 0, 0)
boxShaderList[side].shininess = 0
boxShaderList[side].textureRepeat = 0
Making the shader's emissive property pure white (rgb(255, 255, 255)) makes the material look self-illuminated. The ambient, diffuse and specularproperties are set to rgb(0,0,0) to further ensure the shader is not affected by any lights in the scene.
The textureRepeat property has a default value of TRUE (1), which means the texture will repeat across the surface if necessary. A value of FALSE (0) will scale the map to the size of the surface, and, in our case, will result in a seamless edge between one texture map and the next.
-- assign textures to shaders -- and shaders to box faces boxShaderList[side].texture = boxTextureList[side] boxMod.shaderList[side] = boxShaderList[side]
The shaderList allows us to assign a map to a particular face of the cube. TheshaderList is a linear list for each mesh within the model resource. For a sphere, there is only one model resource. Therefore, a sphere shaderListwill only have one entry. In the case of a box, there are 6 meshes, one for each face of the box.
end repeat
-------------------------
end
Setting up the 3D navigation
1. Create a new behavior called 3D navigation. This should be attached to the 3D sprite and contain the following script:
-- reference to the 3D member, 3D sprite, sprite's camera
property p3Dmember, pSprite, pCamera
-- reference to the sphere used to surround the camera
-- (will be used for collision detection)property pCameraSphere
-- indicates if the user is pressing the arrow keys
-- by TRUE or FALSE value relating to a down or up-- position.
property pUpArrow, pDownArrow, pLeftArrow, pRightArrow
-- indicates if the user is pressing the left mouse-- button or the right mouse button (Win) or is-- holding the control key while pressing the mouse
-- down (Mac)property pMouseDown, pRightMouseDown
on beginSprite me
-- initiate properties
pSprite = sprite(me.spriteNum)
p3Dmember = pSprite.member
pCamera = pSprite.camera
pSprite = sprite(me.spriteNum)
p3Dmember = pSprite.member
pCamera = pSprite.camera
pUpArrow = FALSE
pDownArrow = FALSE
pLeftArrow = FALSE
pRightArrow = FALSE
pMouseDown = FALSE
pRightMouseDown = FALSE
pDownArrow = FALSE
pLeftArrow = FALSE
pRightArrow = FALSE
pMouseDown = FALSE
pRightMouseDown = FALSE
-- create the camera's bounding sphere
camSphereRes = \
p3Dmember.newModelResource("camSphereRes",#sphere)
camSphereRes.radius = 20
pCameraSphere = \
p3Dmember.newModel("cameraSphere",camSphereRes)
camSphereRes = \
p3Dmember.newModelResource("camSphereRes",#sphere)
camSphereRes.radius = 20
pCameraSphere = \
p3Dmember.newModel("cameraSphere",camSphereRes)
-- make the sphere a child of the camera, using
-- #preserveParent so the sphere will move with the
-- camera (the parent) pCamera.addChild(pCameraSphere,#preserveParent)
-- register the member for regular timeMS events in -- order to respond to user input and resolve camera -- collisions i.e. after specified time segments -- activate the controlCamera handler p3Dmember.registerForEvent(#timeMS,#controlCamera,me,1000,10,0)
end
In the above script me is the scriptObject parameter and indicates thecontrolCamera handler is in the same script as the registerForEventcommand. 1000 is the begin parameter and indicates that the first time thecontrolCamera handler is to be activated will be 1 second (or 1000milliseconds) after the registerForEvent command has occurred. 10 is theperiod parameter and indicates the subsequent time interval (in milliseconds) for the controlCamera handler to be activated. 0 is the repetitions parameter and indicates the #timeMS event will occur indefinitely. Using 0 for repetitionsmakes the period parameter insignificant (it will be ignored).
on keyDown
-- update the key property based on which key is -- pressed
case the keycode of
123 : pLeftArrow = TRUE -- left arrow
124 : pRightArrow = TRUE -- right arrow
125 : pDownArrow = TRUE -- down arrow 126 : pUpArrow = TRUE -- up arrow end caseend
-- update the key property based on which key is -- pressed
case the keycode of
123 : pLeftArrow = TRUE -- left arrow
124 : pRightArrow = TRUE -- right arrow
125 : pDownArrow = TRUE -- down arrow 126 : pUpArrow = TRUE -- up arrow end caseend
on keyUp
-- update the key properties
pLeftArrow = FALSE
pRightArrow = FALSE
pUpArrow = FALSE
pDownArrow = FALSE
end
-- update the key properties
pLeftArrow = FALSE
pRightArrow = FALSE
pUpArrow = FALSE
pDownArrow = FALSE
end
on mouseDown
-- update the mouse down property
pMouseDown = TRUE
end
-- update the mouse down property
pMouseDown = TRUE
end
on mouseUp
-- update the mouse up property
pMouseDown = FALSE
end
on rightMouseDown
-- update the right mouse down property
pRightMouseDown = TRUE
end
on rightMouseUp
-- update the right mouse up property
pRightMouseDown = FALSE
end
-- update the mouse up property
pMouseDown = FALSE
end
on rightMouseDown
-- update the right mouse down property
pRightMouseDown = TRUE
end
on rightMouseUp
-- update the right mouse up property
pRightMouseDown = FALSE
end
on controlCamera me
-- control the left/right/forward/backward movement
-- and rotation of the camera
-- if the left arrow key is pressed then move the
-- camera left if pLeftArrow then pCamera.translate(-5,0,0)
-- and rotation of the camera
-- if the left arrow key is pressed then move the
-- camera left if pLeftArrow then pCamera.translate(-5,0,0)
-- if the right arrow key is pressed then move the
-- camera right
if pRightArrow then pCamera.translate(5,0,0)
-- camera right
if pRightArrow then pCamera.translate(5,0,0)
-- if the up arrow key is pressed then move the
-- camera forward
if pUpArrow then pCamera.translate(0,0,-3)
-- camera forward
if pUpArrow then pCamera.translate(0,0,-3)
-- if the down arrow key is pressed then move the
-- camera backward
if pDownArrow then pCamera.translate(0,0,3)
-- camera backward
if pDownArrow then pCamera.translate(0,0,3)
-- if the left mouse is down then rotate the camera
-- clockwise
if pMouseDown then pCamera.rotate(0,-2,0)
-- if the right mouse is down then rotate the camera -- anti-clockwise
if pRightMouseDown then pCamera.rotate(0,2,0)
-- clockwise
if pMouseDown then pCamera.rotate(0,-2,0)
-- if the right mouse is down then rotate the camera -- anti-clockwise
if pRightMouseDown then pCamera.rotate(0,2,0)
end
2. Rewind and play the movie. Click on the mouse button and the arrow keys.
Everything should work nicely until you get close to the walls, and find you can walk through them. This occurs because we have yet to add our collision detection.
Setting up Collision detection
3. Next, we write the code for the collision detection using the modelsUnderRaytechnique.This will involve casting rays from the camera in 4 directions - forward, backward, left and to the right. For each ray cast, we will have to verify if the distance to the nearest model exceeds the camera's bounding sphere radius. If the distance is less than the bounding sphere's radius, we will then move the camera out of the collision state in a direction perpendicular to the intersected model's surface.
The modelsUnderRay command returns a list of models found under the ray. The syntax is as follows:
member(whichCastmember).modelsUnderRay(locationVector, directionVector, \
{maxNumberOfModels, levelOfDetail})
maxNumberOfModels and levelOfDetail are optional parameters.
Add the following code to the end of the 3D navigation script. Make sure it appears just before the end statement. Setting up Collision detection
3. Next, we write the code for the collision detection using the modelsUnderRaytechnique.This will involve casting rays from the camera in 4 directions - forward, backward, left and to the right. For each ray cast, we will have to verify if the distance to the nearest model exceeds the camera's bounding sphere radius. If the distance is less than the bounding sphere's radius, we will then move the camera out of the collision state in a direction perpendicular to the intersected model's surface.
The modelsUnderRay command returns a list of models found under the ray. The syntax is as follows:
member(whichCastmember).modelsUnderRay(locationVector, directionVector, \
{maxNumberOfModels, levelOfDetail})
maxNumberOfModels and levelOfDetail are optional parameters.
-- Control collisions of the camera with the walls
-- of the cube
-- of the cube
-- cast a ray to the left
collisionList = \
p3Dmember.modelsUnderRay(pCamera.worldPosition,\
-pCamera.transform.xAxis,#detailed)
collisionList = \
p3Dmember.modelsUnderRay(pCamera.worldPosition,\
-pCamera.transform.xAxis,#detailed)
In the above statement, we create a list (collisionList), to hold the information generated by the modelsUnderRay command. #detailed is used for thelevelOfDetail parameter and will return a list of property lists, each representing an intersected model. #distance is one of the properties that will appear on the property list, which, in our case, represents the distance from the camera to the point of intersection with the model.
-- if there are models in front of the camera check
-- for collisions
if (collisionList.count) then
-- go to custom handler checkForCollision -- and send the collisionList as a parameter.
me.checkForCollision(collisionList[1])
end if
-- if there are models in front of the camera check
-- for collisions
if (collisionList.count) then
-- go to custom handler checkForCollision -- and send the collisionList as a parameter.
me.checkForCollision(collisionList[1])
end if
-- cast a ray to the right
collisionList = \
p3Dmember.modelsUnderRay( pCamera.worldPosition,\
pCamera.transform.xAxis,#detailed)
-- if there are models in front of the camera check
-- for collisions
if (collisionList.count) then
me.checkForCollision(collisionList[1])
end if
-- cast ray forward
collisionListt = \
p3Dmember.modelsUnderRay(pCamera.worldPosition,\
-pCamera.transform.zAxis,#detailed)
-- if there are models in front of the camera check -- for collisions
if (collisionList.count) then
me.checkForCollision(collisionList[1])
end if
-- cast ray backward
collisionList = \
p3Dmember.modelsUnderRay(pCamera.worldPosition,\
pCamera.transform.zAxis,#detailed)
-- if there are models in front of the camera check -- for collisions
if (collisionList.count) then
me.checkForCollision(collisionList[1])
end if
collisionList = \
p3Dmember.modelsUnderRay(pCamera.worldPosition,\
pCamera.transform.zAxis,#detailed)
-- if there are models in front of the camera check -- for collisions
if (collisionList.count) then
me.checkForCollision(collisionList[1])
end if
This next custom message (checkForCollision me, thisData) is activated when a model is picked up by modelsUnderRay. The statement we used above:
me.checkForCollision(collisionList[1]) -- dot syntax
is equivalent to
checkForCollision me, collisionList[1] -- verbose syntax
So, collisionList[1] is assigned as a value to the parameter thisData.
Add the following to the end of the behavior. Make sure it appears after theend statement.
on checkForCollision me, thisData
-- grab the #distance value from the collisionList
dist = thisData.distance
-- check if distance is smaller than the radius of -- the bounding sphere
if (dist < pCameraSphere.resource.radius) then
-- get distance of penetration
diff = pCameraSphere.resource.radius - dist
-- calculate vector perpendicular to the wall's
-- surface to move the camera (using the -- #isectNormal property)
tVector = thisData.isectNormal * diff
-- move the camera in order to resolve the -- collision
pCamera.translate(tVector,#world)
end if
end
4. Now play the movie and see how it works.
You can download the movie at this stage from from here.
As you can see, this is not a true Cubic VR. While it does give a sense of movement around the space, as we move closer to the walls of the box, the realism starts to diminish because the 'flatness' of the faces and perspective distortion becomes more noticeable. In a true Cubic VR, the camera would always remain at the centre of the cube. Zooming in and out may be possible. Keeping the camera at the centre will maintain a greater realism to the spatial experience. So, that's what we'll look at now.
Creating a skybox/Cubic VR zoom and rotate
This section covers a behavior adapted from Barry Swan's skybox demo. His demo and source files can be found at:http://www.inludo.com/tuts/skybox01.htm
1. Remove/delete the 3D navigation behavior from the 3D sprite and create a new behavior called Cubic VR camera controller. Enter the following into the script:
-- Camera rotation and zoom controller
property pCamera -- reference to the 3D camera-- Camera rotation and zoom controller
-- reference to whether the rotation is happening-- and mouse start positionproperty pIsRotating, pStartLoc
-- camera location properties property pXAngle, pXCamera
-- camera zoom properties
property pFOV, pFOVmin, pFOVmax, pZoomSpeed
on beginSprite me
-- camera properties pCamera = sprite(me.spriteNum).camera pFOV = pCamera.fieldOfView
pFOVmin = 20.0 -- min zoom in pFOVmax = 120.0 -- max zoom out pZoomSpeed = 1.0 -- speed of zoom
-- store a copy of all camera transform properties pXCamera = pCamera.transform.duplicate()
pXAngle = 0.0 -- starting angle for rotation pIsRotating = 0 -- not rotating at start
end
-- start rotating and set start position of mouseon mouseDown me pStartLoc = the mouseLoc pIsRotating = 1end
on mouseUp me pIsRotating = 0 -- stop rotationend
on mouseUpOutside me pIsRotating = 0 -- stop rotationend
on exitFrame me
-- zooming effect if rollover(me.spriteNum) then
if the shiftDown then -- change fieldofView until it reaches max zoom -- in = pFOVmin pFOV = max(pFOV - pZoomSpeed/2, pFOVmin)
pCamera.fieldofview = pFOV
else if the commandDown then -- change fieldofView until it reaches max zoom -- out = pFOVmax pFOV = min(pFOV + pZoomSpeed/2, pFOVmax)
pCamera.fieldofview = pFOV
end if
end if
-- rotating movement if pIsRotating then currentLoc = the mouseLoc currentDX = currentLoc.locH - pStartLoc.locH
currentDY = currentLoc.locV - pStartLoc.locV
-- modify camera rotation (rotates at a speed -- proportional to pFOV) proportion = -0.00012 * pFOV
pXCamera.rotate(0.0, currentDX * proportion, 0.0)
pXAngle = min(max(pXAngle + currentDY * \
proportion, -90.0), 90.0)
-- set camera rotation pCamera.transform.rotation = pXCamera.rotation pCamera.rotate(pXAngle, 0.0, 0.0) end if
end
2. Now play the movie and see how it works.
You can download the completed movie from here.


0 comments:
Post a Comment