Light Attributes
Intensity
A light's Intensity attribute controls the brightness of the source. You can set it to any value, positive or negative. If the intensity is raised, more light is emitted from the source . Usually, you set the value between 0 and 1 for a medium-intensity fill light. For sunlight effects, you might go as high as 1.5 or so. With Decay Rate added , the light's Intensity value might need to be set much higher because the strength can fall off rapidly with distance. All Maya's default lights have no decay rate and illuminate objects at full intensity, regardless of distance.You can also use negative values for the Intensity attribute. By setting a negative value, the light actually "absorbs" other light. If you have an area of the scene that you want to be pitch-black but have light illuminating it, you can use a light with a negative Intensity setting to help eliminate the problem.
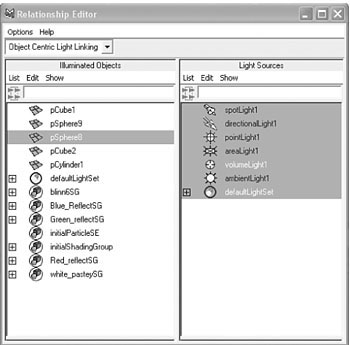
Fig 6_6 Relationship Editor
No Decay The light does not diminish with distance; it reaches all objects in the scene.
Linear The intensity of emitted light decreases at a constant (linear) rate as distance from the light source increases. Linear decay is the most frequently used type because it's easier to control; you don't need to raise the light's Intensity attribute to enormously high values to compensate.
Quadratic A physically accurate mode of decay, also known as inverse square. Quadratic decay is determined by proportionally decreasing the light intensity along the square of the distance. Light intensity generally must be raised substantially with this mode.
Cubic Decreases the intensity of light faster than the rate seen in reality. Cubic Decay is evaluated by a decrease in intensity that's relatively proportional to the cube of the distance. The lit area falls off almost instantly with Cubic Decay. This type of decay can be used to create a lit area that seems as though it's burning within surrounding darkness.
IPR rendering is a helpful tool for interactively adjusting light decay; it's hard to visualize otherwise.
Shadows tend to wash each other out as you add more shadow-casting lights that illuminate the same area. With Maya, you have a lot of control over the way shadows are cast in a scene, which can help you reduce render times, add contrast to your renderings, and create a better-looking overall result. There are two types of shadows in Maya: depth map and ray traced shadows.
Depth Map Shadows
Depth map shadows are produced through an image map. The depth map is calculated immediately before the actual render takes place. Using calculations for the distance of light to a specific point on an object, depth information is stored in the map and then passed on to the rendering engine to produce a "simulated" shadow effect. The depth map tells the rendering engine which areas of the scene are illuminated by light
Depth map shadows usually give good results without having to worry about a huge increase in render time. They are usually slightly softer, too, which is more natural than harsh-edged ray traced shadows. If you want, you can achieve almost the same level of sharpness as ray traced shadows. Depth map shadows work in a unique way for Point, Ambient, and Area lights: Because a square bitmap is required to create the shadow, and these light types cast light in all directions, they must create multiple maps to cover the area. Maya uses cubic shadow maps for these light types—that is, six depth maps are cast for the six sides of a cube. This process requires six times the RAM, which could be a concern for large map sizes.
The main drawback to depth map shadows is that they don't take materials' transparency into account.
Dmap Resolution Specifies the resolution (accuracy) of a depth map shadow. The maps are square, so if you set this attribute to 1024, the shadow map is produced as a 1024x1024 pixel image. When setting Dmap Resolutions, try to use values that are powers of 4, such as 128, 256, 512, and 1024. These numbers are easier for Maya to calculate with and can result in faster render times. At very large sizes (4096+), RAM consumption can become a problem. Increasing the resolution also reduces the jagged effect, but creates a sharper shadow edge.
Dmap Filter Size Directly affects the edges of a depth map shadow by making them softer. This attribute, combined with the Dmap Resolution, can smoothly and gradually soften a shadow's edge. Be aware that increasing this value increases render times. Use values between 1 and 3, unless you truly need to go higher.
Dmap Bias When depth map shadow–casting lights are casting long shadows, they can sometimes separate from the objects. This setting allows you to adjust the placement of the shadows, and you usually need to adjust it only for very low light angles (such as a setting sun).
Transparent objects can affect shadows if the shadows are raytraced. However, the color values do not affect shadow color. To cast colored raytraced shadows, you must set or map the transparency color for the material.
Shadow Rays Controls the sampling of soft shadows. If you use a low number, the shadows look speckled, but render faster. This is similar to the way that Dmap Filter Size works with depth map shadows, in that increasing the Shadow Rays setting reduces the shadow's graininess.
Ray Depth Limit This setting enables you to limit the number of times a light bounces from reflective and refractive materials. You can raise this value if you want to allow raytraced light rays to bounce around the scene before eventually creating a shadow.
Intensity
A light's Intensity attribute controls the brightness of the source. You can set it to any value, positive or negative. If the intensity is raised, more light is emitted from the source . Usually, you set the value between 0 and 1 for a medium-intensity fill light. For sunlight effects, you might go as high as 1.5 or so. With Decay Rate added , the light's Intensity value might need to be set much higher because the strength can fall off rapidly with distance. All Maya's default lights have no decay rate and illuminate objects at full intensity, regardless of distance.You can also use negative values for the Intensity attribute. By setting a negative value, the light actually "absorbs" other light. If you have an area of the scene that you want to be pitch-black but have light illuminating it, you can use a light with a negative Intensity setting to help eliminate the problem.
Illuminates by Default
By default, lights automatically illuminate all objects in the scene. When you disable the Illuminates by Default check box, the light is removed from the default Light Set and affects only objects it's linked to. Light linking is handled in the Relationship Editor for lights (Window > Relationship Editors > Light Linking). In this dialog box, you can select a light and then choose which objects it illuminates .Fig 6_6 Relationship Editor
Emit Diffuse and Emit Specular
The Emit Diffuse and Emit Specular attributes are not available with Ambient lights. Emit Diffuse is particularly useful for creating soft fill lights to simulate light reflection; you need to disable the Emit Specular attribute so that no highlights are generated. Emit Specular can also be useful for lighting metal objects (such as chrome logos) when you want to add specular highlights to the metal without brightening other areas.Color
Each light can have its own color assigned, and modifying the color of a light follows the same procedure and uses the same Color Chooser dialog box you see when modifying color for a material. You can also map textures to a light's color, causing the light to project the texture like a slide projector. Or if you animate the texture variables or use a movie as the source, the light acts as a movie projector.Decay Rate
Specific to Spot, Area, and Point lights, this attribute determines the rate at which the light intensity fades (decreases) at a distance. Several types of decay are available in the Attribute Editor's Decay Rate list box.No Decay The light does not diminish with distance; it reaches all objects in the scene.
Linear The intensity of emitted light decreases at a constant (linear) rate as distance from the light source increases. Linear decay is the most frequently used type because it's easier to control; you don't need to raise the light's Intensity attribute to enormously high values to compensate.
Quadratic A physically accurate mode of decay, also known as inverse square. Quadratic decay is determined by proportionally decreasing the light intensity along the square of the distance. Light intensity generally must be raised substantially with this mode.
Cubic Decreases the intensity of light faster than the rate seen in reality. Cubic Decay is evaluated by a decrease in intensity that's relatively proportional to the cube of the distance. The lit area falls off almost instantly with Cubic Decay. This type of decay can be used to create a lit area that seems as though it's burning within surrounding darkness.
IPR rendering is a helpful tool for interactively adjusting light decay; it's hard to visualize otherwise.
Shadows
Shadows in Maya can be turned on or off. The default setting for lights is to have the shadow set to off. Surfaces illuminated by the non-shadow–casting light are still shaded by it, but won't cast shadows onto other surfaces. That means the part of an object that's exposed to light is illuminated, and the object's opposite side fades to a darker tone. An object's shadow can identify its size, position, and orientation in space, so by adding shadows to your scene, you can more clearly define the spatial relationships between objects. Without shadows in a scene, the render looks flat and lacks depth. Shadows add depth and realism to the scene, especially indoor scenes.Shadows tend to wash each other out as you add more shadow-casting lights that illuminate the same area. With Maya, you have a lot of control over the way shadows are cast in a scene, which can help you reduce render times, add contrast to your renderings, and create a better-looking overall result. There are two types of shadows in Maya: depth map and ray traced shadows.
Depth Map Shadows
Depth map shadows are produced through an image map. The depth map is calculated immediately before the actual render takes place. Using calculations for the distance of light to a specific point on an object, depth information is stored in the map and then passed on to the rendering engine to produce a "simulated" shadow effect. The depth map tells the rendering engine which areas of the scene are illuminated by light
Depth map shadows usually give good results without having to worry about a huge increase in render time. They are usually slightly softer, too, which is more natural than harsh-edged ray traced shadows. If you want, you can achieve almost the same level of sharpness as ray traced shadows. Depth map shadows work in a unique way for Point, Ambient, and Area lights: Because a square bitmap is required to create the shadow, and these light types cast light in all directions, they must create multiple maps to cover the area. Maya uses cubic shadow maps for these light types—that is, six depth maps are cast for the six sides of a cube. This process requires six times the RAM, which could be a concern for large map sizes.
The main drawback to depth map shadows is that they don't take materials' transparency into account.
Depth Map Attributes
Shadow Color Applicable to both types of shadows in Maya. Changing the Shadow Color attribute changes the shadow's color seen in the render. It's often a good idea to bring shadow colors a little brighter than pure black, to add to the simulation of diffuse light reflection. You can also map an image file or a texture to the Shadow Color, just as you would map an image to a material.Dmap Resolution Specifies the resolution (accuracy) of a depth map shadow. The maps are square, so if you set this attribute to 1024, the shadow map is produced as a 1024x1024 pixel image. When setting Dmap Resolutions, try to use values that are powers of 4, such as 128, 256, 512, and 1024. These numbers are easier for Maya to calculate with and can result in faster render times. At very large sizes (4096+), RAM consumption can become a problem. Increasing the resolution also reduces the jagged effect, but creates a sharper shadow edge.
Dmap Filter Size Directly affects the edges of a depth map shadow by making them softer. This attribute, combined with the Dmap Resolution, can smoothly and gradually soften a shadow's edge. Be aware that increasing this value increases render times. Use values between 1 and 3, unless you truly need to go higher.
Dmap Bias When depth map shadow–casting lights are casting long shadows, they can sometimes separate from the objects. This setting allows you to adjust the placement of the shadows, and you usually need to adjust it only for very low light angles (such as a setting sun).
Raytraced Shadows
Raytraced shadows are generally slower to compute, but offer the advantage of lower RAM requirements, soft shadows, and properly cast shadows for objects that have transparency, such as windows. To make raytraced shadows appear in your renderings, you must go to the Render Global Settings window and enable raytracing. Like the Area light, the Spot, Directional, Ambient, and Point lights can cast area shadows. In this case, the soft shadows are created by having the light cast from a circular source. Non–Point light sources create soft shadows (known as penumbral shadows) because a variable amount of the non–Point light source is blocked as an object passes in front of the light.Transparent objects can affect shadows if the shadows are raytraced. However, the color values do not affect shadow color. To cast colored raytraced shadows, you must set or map the transparency color for the material.
Raytraced Shadow Attributes
Light Radius Sets the imaginary size of the circular Area light effect.Shadow Rays Controls the sampling of soft shadows. If you use a low number, the shadows look speckled, but render faster. This is similar to the way that Dmap Filter Size works with depth map shadows, in that increasing the Shadow Rays setting reduces the shadow's graininess.
Ray Depth Limit This setting enables you to limit the number of times a light bounces from reflective and refractive materials. You can raise this value if you want to allow raytraced light rays to bounce around the scene before eventually creating a shadow.


0 comments:
Post a Comment