Maya user interface looks very complex at first. However, this large number of functions and the scope to add more functions to the user interface provides the real flexibility to the program. Other than the functions common for all the various aspects of a 3d graphics software application, there are set of functions dedicated to a more specific task like modeling, texturing, animation, rendering etc. The default Maya user interface can be divided into the following sections.
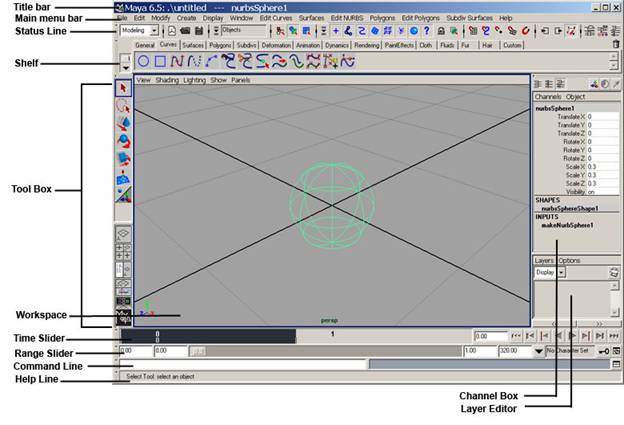 Fig 1-1 Maya User Interface
The menus in the menu sets behave similarly as a normal window menu. Other than the menu sets, there are common menus like File, Edit etc.
Any Menu item that has double lines over it can be dragged of the menu bar to create a min-toolbox so that the commonly used tools can float on the desktop.
You can hide or display different UI elements from the Menu item Display-> UI Elements.

Fig1-2 Menu Bar
The Status Line
The commands available on the status line are mostly use for the purpose of modeling. On the extreme left we have mode selector that helps us to change modes between modeling, animation, rendering or dynamics etc.
A collapser is a clickable switch for hiding a section of the Status Line. Collapsers can be used to hide or display sections of the status line and adjust the number of available functions at an instance.
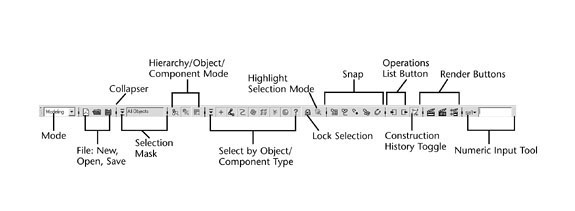
Fig1-3 Status Line
Selection Mask lets us select the masking preset so that certain types of objects can be ignored while making selections in a 3d panel. The icons to the right of the list box show the masking selections that have been made. The selection mask list box acts as a preset for the buttons in the Select by Type area farther to the right. These buttons correspond to Hierarchy, Object and Component mode. These functions can be used to select entire objects and mask the selection to pick only particular type of objects such as surfaces, lines, cameras etc.
Component Selection mode enables you to adjust subcomponents of an object, such as letting you select a certain portion of an object such as a box or a sphere and deform it. The hierarchy selection mode is used to select only the parent or only the children objects, this comes in handy when setting up object hierarchies.
A selection can be locked by pressing the Lock Selection button. This helps in avoiding accidentally de-selection of an object. Next is Highlight Selection Mode button, a toggle to highlight the selected object in the display.
We use snap tools to ease modeling and modifying objects by making it seem as though an object or part of an object is drawn toward another.
You use the Operations List buttons to view upstream and downstream connections and enable or disable them. Next is Construction History toggle and Maya uses this to record construction. History is not related to the Undo operation. Having Construction History enabled can make files large and slow to load, however, so you might opt to turn it off sometimes.
Next we have the Quick Render, Interactive Photorealistic Renderer(IPR) and Render Globals button. Quick Render and Interactive Photorealistic Renderer is used to render a scene at full quality. IPR rendering is slower, but when finished, it can update the rendering in nearly real time. Next is the Render Globals button, which controls the size of the rendering and many other parameters.
The last we have Numeric Input tool. It can operate in different types of modes. It is used to type in a prefix or common letters and select all the objects you want quickly, rename the currently selected object, and enter an exact value for the current highlighted transform.
- Main Menu Bar
- Status Line
- Shelf
- Tool Box
- Workspace
- Panel Menus
- Time Slider
- Range Slider
- Command Line
- Help Line
- Channel box
- Layer editor
Fig 1-1 Maya User InterfaceThe Menu Bar
There are different menu sets in Maya that correspond to the more specific aspects of the application like Animation, Modeling, Dynamics, Rendering, cloth and Maya Live. The cloth and Maya Live are available with Maya unlimited version. These Menu sets can also be accessed using the hot keys F2, F3, F4 etc.The menus in the menu sets behave similarly as a normal window menu. Other than the menu sets, there are common menus like File, Edit etc.
Any Menu item that has double lines over it can be dragged of the menu bar to create a min-toolbox so that the commonly used tools can float on the desktop.
You can hide or display different UI elements from the Menu item Display-> UI Elements.
Fig1-2 Menu Bar
The Status Line
The commands available on the status line are mostly use for the purpose of modeling. On the extreme left we have mode selector that helps us to change modes between modeling, animation, rendering or dynamics etc.
A collapser is a clickable switch for hiding a section of the Status Line. Collapsers can be used to hide or display sections of the status line and adjust the number of available functions at an instance.
Fig1-3 Status Line
Selection Mask lets us select the masking preset so that certain types of objects can be ignored while making selections in a 3d panel. The icons to the right of the list box show the masking selections that have been made. The selection mask list box acts as a preset for the buttons in the Select by Type area farther to the right. These buttons correspond to Hierarchy, Object and Component mode. These functions can be used to select entire objects and mask the selection to pick only particular type of objects such as surfaces, lines, cameras etc.
Component Selection mode enables you to adjust subcomponents of an object, such as letting you select a certain portion of an object such as a box or a sphere and deform it. The hierarchy selection mode is used to select only the parent or only the children objects, this comes in handy when setting up object hierarchies.
A selection can be locked by pressing the Lock Selection button. This helps in avoiding accidentally de-selection of an object. Next is Highlight Selection Mode button, a toggle to highlight the selected object in the display.
We use snap tools to ease modeling and modifying objects by making it seem as though an object or part of an object is drawn toward another.
You use the Operations List buttons to view upstream and downstream connections and enable or disable them. Next is Construction History toggle and Maya uses this to record construction. History is not related to the Undo operation. Having Construction History enabled can make files large and slow to load, however, so you might opt to turn it off sometimes.
Next we have the Quick Render, Interactive Photorealistic Renderer(IPR) and Render Globals button. Quick Render and Interactive Photorealistic Renderer is used to render a scene at full quality. IPR rendering is slower, but when finished, it can update the rendering in nearly real time. Next is the Render Globals button, which controls the size of the rendering and many other parameters.
The last we have Numeric Input tool. It can operate in different types of modes. It is used to type in a prefix or common letters and select all the objects you want quickly, rename the currently selected object, and enter an exact value for the current highlighted transform.


0 comments:
Post a Comment