Shelf
Shelf contains different tools and commands. The shelf can be customized for one's specific needs. It is used to organize commonly used functions and tools into groups. You can create different shelves for different functions like modeling, animation, texturing etc with the required tools for each function.
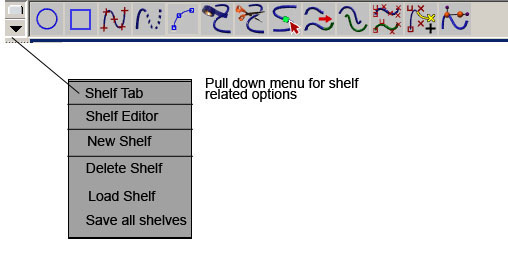
Fig1-4 Shelf
Tool Box
Maya Tool Box contains common tools as well as Layout buttons for changing views and layouts. The first one is the select tool. As the name explains itself, while this option is selected, you can use the mouse pointer to click over a particular object to select it. You can also click and drag over a number of objects to select them all together. The lasso tool is also used for selection in a way that you can draw a free hand border around the objects to be selected.
The move, rotate and scale tools are used for transforming objects in Maya. The soft modification tool is used to select the sub-object elements and modify them by moving, rotating or scaling in a way that the neighboring sub-objects also get affected by this deformation with the effect being an inverse of distance from the primary selected sub-objects.
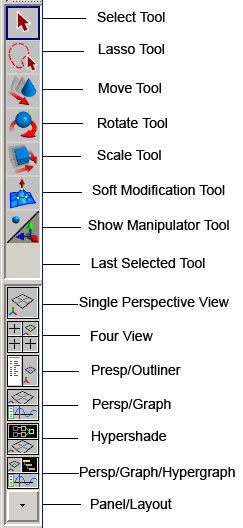
Fig1-5 Toolbox
The last selected tool section shows the last used tool for easy access.
The single perspective view button lets you view the workspace as a single large view from a single perspective. The Four views can be used to view the workspace in four sections with each section containing the three orthographic views top, side and front and a perspective view respectively.
The other combination options below these tools are used to divide the workspace into different section in such a way that one section contains the view of the scene and other contains an animation or rendering editor so that you can edit the attributes and watch the results simultaneously.
Workspace
The Workspace displays by default in a perspective window or panel. The purpose of using workspace is to view your scene. You can display various editors and arrange the workspace panels in different layouts. The workspace can be divided into sections to accommodate the orthographic and perspective views of the scenes as well as the different editors for animation, texturing and rendering etc.
Time Slider and Range Slider
The Two Sliders are for controlling the frames in your animation. The Time Slider includes the playback buttons and the current time indicator. The Range slider includes start and end times and allows animators to focus on a specific part of the animation.

Fig1-6 Time slider and Range slider
Command Line
The command Line lets you enter the MEL (Maya embedded Language) commands to perform various functions. The MEL is a powerful feature of Maya that provides us with a vast flexibility and a scope to exploit the Maya tools beyond the user interface.
The left side is where you can type MEL commands and the right half displays system responses, error messages, and warnings. For a longer series of commands, use the Script Editor. The right side can also show echoes of all commands if you turn on Script> Echo All Commands from the Script Editor.

Fig1-7 Maya Command Line
Panel Menus
Every view panel you work in has a common set of menus at the top. The panel menu that appears in a 3d scene, shown here with lighting menu selected. If the panel menus do not appear, you can enable them in Window> Settings/Preferences> Preferences, and then click the Interface entry under the Categories list on the left side of the dialog box.
Under the View menu, you'll see options for Look at Selected, Frame Selected, and Frame All. These options are helpful for finding an item and focusing on it.
Under the Shading menu, the first two entries are Wireframe (hotkey: 4) and Smooth Shade All (hotkey: 5).An important option to note is the NURBS detail mode. When you're working with NURBS, you can display them in three detail levels: low (hotkey: 1), medium (hotkey: 2), or high (hotkey: 3). These hotkeys work only with NURBS.
Shelf contains different tools and commands. The shelf can be customized for one's specific needs. It is used to organize commonly used functions and tools into groups. You can create different shelves for different functions like modeling, animation, texturing etc with the required tools for each function.
Fig1-4 Shelf
Tool Box
Maya Tool Box contains common tools as well as Layout buttons for changing views and layouts. The first one is the select tool. As the name explains itself, while this option is selected, you can use the mouse pointer to click over a particular object to select it. You can also click and drag over a number of objects to select them all together. The lasso tool is also used for selection in a way that you can draw a free hand border around the objects to be selected.
The move, rotate and scale tools are used for transforming objects in Maya. The soft modification tool is used to select the sub-object elements and modify them by moving, rotating or scaling in a way that the neighboring sub-objects also get affected by this deformation with the effect being an inverse of distance from the primary selected sub-objects.
Fig1-5 Toolbox
The last selected tool section shows the last used tool for easy access.
The single perspective view button lets you view the workspace as a single large view from a single perspective. The Four views can be used to view the workspace in four sections with each section containing the three orthographic views top, side and front and a perspective view respectively.
The other combination options below these tools are used to divide the workspace into different section in such a way that one section contains the view of the scene and other contains an animation or rendering editor so that you can edit the attributes and watch the results simultaneously.
Workspace
The Workspace displays by default in a perspective window or panel. The purpose of using workspace is to view your scene. You can display various editors and arrange the workspace panels in different layouts. The workspace can be divided into sections to accommodate the orthographic and perspective views of the scenes as well as the different editors for animation, texturing and rendering etc.
Time Slider and Range Slider
The Two Sliders are for controlling the frames in your animation. The Time Slider includes the playback buttons and the current time indicator. The Range slider includes start and end times and allows animators to focus on a specific part of the animation.
Fig1-6 Time slider and Range slider
Command Line
The command Line lets you enter the MEL (Maya embedded Language) commands to perform various functions. The MEL is a powerful feature of Maya that provides us with a vast flexibility and a scope to exploit the Maya tools beyond the user interface.
The left side is where you can type MEL commands and the right half displays system responses, error messages, and warnings. For a longer series of commands, use the Script Editor. The right side can also show echoes of all commands if you turn on Script> Echo All Commands from the Script Editor.
Fig1-7 Maya Command Line
Help Line
Like several other applications, you can look at the help line for descriptions, instructions, and other useful information. While a tool is selected, the helpline gives out a brief description for "how to" and "what for".Panel Menus
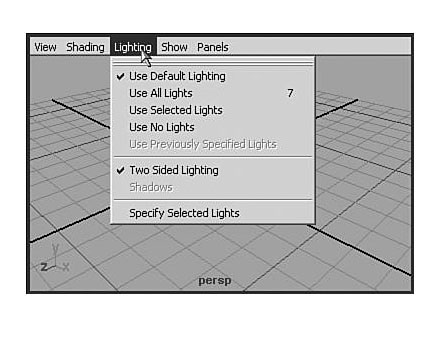
Every view panel you work in has a common set of menus at the top. The panel menu that appears in a 3d scene, shown here with lighting menu selected. If the panel menus do not appear, you can enable them in Window> Settings/Preferences> Preferences, and then click the Interface entry under the Categories list on the left side of the dialog box.
Under the View menu, you'll see options for Look at Selected, Frame Selected, and Frame All. These options are helpful for finding an item and focusing on it.
Under the Shading menu, the first two entries are Wireframe (hotkey: 4) and Smooth Shade All (hotkey: 5).An important option to note is the NURBS detail mode. When you're working with NURBS, you can display them in three detail levels: low (hotkey: 1), medium (hotkey: 2), or high (hotkey: 3). These hotkeys work only with NURBS.


0 comments:
Post a Comment