Materials are a critical part of creating attractive images and animation in a 3D program. Materials interact with lights, so lighting drives some material choices; for example, if your overall lighting is bright, you might need to make your scene materials somewhat more matte and light absorbing so that they don't blow out when hit by bright lights.
What do we mean by "materials"? It's a catch-all term to describe all aspects of what a surface looks like. At first glance, beginners usually notice the surface color—red, wood brown, metallic silver. To an artist, however, there are many other factors: An object isn't just metallic silver, for example—it's a mirrored smooth finish that relies on the reflected surroundings for its appearance. In addition to factors of color, shine, and reflection, Maya also considers transparency, incandescence, translucency, refraction, bumpiness, and many other user-controlled parameters. Attention to these details gives your rendered results more subtlety and complexity.
Hypershade
Maya's Hypershade is one of the first and most important areas you should take the time to explore. It provides a quick and easy way to create,edit, and connect rendering nodes, such as textures, materials, lights, rendering utilities and special effects.
Hypershade uses a free-form approach to material design. Swatches connect to one another to create effects; for example, a brick image might connect to the Bump attribute of a material to create bumps in the pattern of bricks. Hypershade also doubles as a kind of browser so that you can view and select existing scene lights, cameras, materials, and other elements.
To open Hypershade, choose Window > Rendering Editors > Hypershade (hotkey: Alt+h).
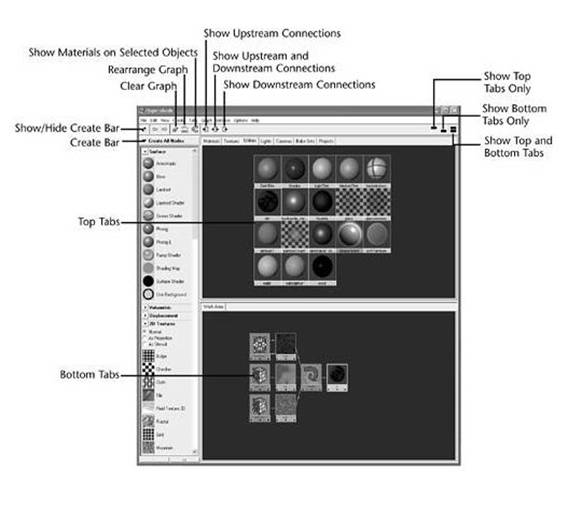
Fig 5-1 Hypershade
Hypershade displays each node as an icon, sometimes called a swatch, that represents the characteristics of the node. When you edit a node's attributes or assign textures or special effects, that swatch updates in hypershade.
Material Settings
To edit material settings, double-click on any material in Hypershade's top or bottom tabs. Usually, you create a Blinn material in the Work Area of the bottom tab panel, and then double-click it to edit it in the Attribute Editor.
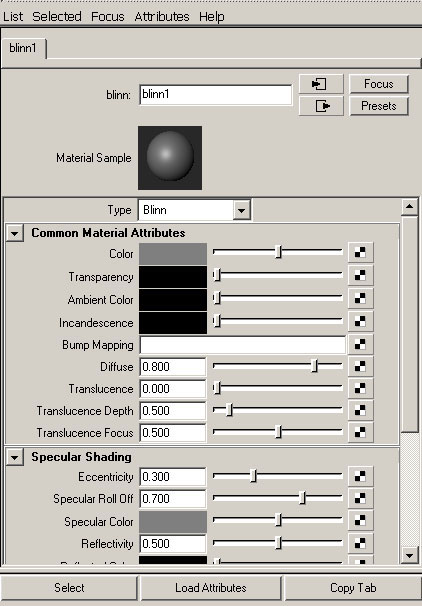
Fig 5_2 Material settings in the attribute editor
Notice the material name at the top of the Attribute Editor, which Maya sets to blinn1 for a default starting name. Maya increments the number if you create more Blinn materials. Next is the Common Material Attributes section, followed by the Specular Shading section. These two sections, displayed by default, are used the most in material editing.
What do we mean by "materials"? It's a catch-all term to describe all aspects of what a surface looks like. At first glance, beginners usually notice the surface color—red, wood brown, metallic silver. To an artist, however, there are many other factors: An object isn't just metallic silver, for example—it's a mirrored smooth finish that relies on the reflected surroundings for its appearance. In addition to factors of color, shine, and reflection, Maya also considers transparency, incandescence, translucency, refraction, bumpiness, and many other user-controlled parameters. Attention to these details gives your rendered results more subtlety and complexity.
Hypershade
Maya's Hypershade is one of the first and most important areas you should take the time to explore. It provides a quick and easy way to create,edit, and connect rendering nodes, such as textures, materials, lights, rendering utilities and special effects.
Hypershade uses a free-form approach to material design. Swatches connect to one another to create effects; for example, a brick image might connect to the Bump attribute of a material to create bumps in the pattern of bricks. Hypershade also doubles as a kind of browser so that you can view and select existing scene lights, cameras, materials, and other elements.
To open Hypershade, choose Window > Rendering Editors > Hypershade (hotkey: Alt+h).
Fig 5-1 Hypershade
Hypershade displays each node as an icon, sometimes called a swatch, that represents the characteristics of the node. When you edit a node's attributes or assign textures or special effects, that swatch updates in hypershade.
Create Bar
At the left is the Create Bar, which displays all the material types you can create for a selected category. Simply click on a type to create that item in the Work Area. To select a category, click the down arrow on the Create Bar; the options are Materials, Textures, Lights, Utilities, and All Nodes.Tab Panels
The top tab shows existing materials, and the bottom tab is used to create and edit materials. After you become familiar with Hypershade, you can customize the tabs to your liking and even add Work Area tabs to simultaneously edit several materials.Top Tab
This area displays all the elements that are already part of the current scene file in these tabs: Materials, Textures, Utilities, Lights, Cameras, and Projects. In this tab, you can duplicate, edit, select objects assigned to shading groups, link lights, import and export materials, and a number of other functionsBottom Tab
This area is usually used as the Work Area—the assembly point for new materials.Basic Material Types
Lambert
Lambert is a flat material type that yields a smooth look without specular highlights. It calculates without taking into account surface or reflectivity, which gives a matte, chalk-like appearance. Lambert material is ideal for surfaces that don't have highlights: pottery, chalk, matte paint, and so forth. By default, any newly created object is assigned the Lambert shader.Phong
The Phong material takes into account specular reflectivity to create highlights across an object surface. The algorithm can be customized for surfaces such as plastic, porcelain, and glazed ceramic.PhongE
PhongE is a faster rendering version of Phong that yields somewhat softer highlights than Phong.Blinn
The Blinn material calculates highlights on surfaces similarly to Phong; however, Blinn can achieve a more accurate representation of the soft tinted highlights you see on metallic surfaces. Because Blinn is a versatile material type and doesn't cause flickering with bump maps.Anisotropic
The Anisotropic material type stretches highlights and rotates them based on the viewer's position. Anisotropic materials are ideal for materials such as hair, feathers, brushed metal, and satin.Ramp Shader
The Ramp Shader material consists of built-in ramp graphs to offer more advanced control and simplify the shader network.Ocean Shader
The Ocean Shader material has several items in the shader's attributes that control how the material behaves over time, and it has graphs to add detail to the base shader. Attributes include Wave Speed, Wave Height, Wave Turbulence, and Wave Peaking.Layered Shader
The Layered Shader lets you combine several materials to create a more complex material.Shading Map
The Shading Map material is primarily designed to let you get a "cel" look in 3D, like typical animated cartoons.Surface Shader
The Surface Shader is used when you want to control a material's color, transparency, and glow with something else in Maya.Use Background
The Use Background shader cuts a "hole" in the image's alpha channel where objects with the material appear. This material is useful for combining separately rendered images in a compositing program to create the final results.Material Settings
To edit material settings, double-click on any material in Hypershade's top or bottom tabs. Usually, you create a Blinn material in the Work Area of the bottom tab panel, and then double-click it to edit it in the Attribute Editor.
Fig 5_2 Material settings in the attribute editor
Notice the material name at the top of the Attribute Editor, which Maya sets to blinn1 for a default starting name. Maya increments the number if you create more Blinn materials. Next is the Common Material Attributes section, followed by the Specular Shading section. These two sections, displayed by default, are used the most in material editing.


0 comments:
Post a Comment