Introduction
This tutorial describes how to draw sections using Key TERRA-FIRMA. The tutorial assumes that you have previously completed the Ground Modelling tutorial or that you already have a good understanding of TERRA-FIRMA ground modelling. TERRA-FIRMA provides a number of methods for creating both long sections and cross sections. A long section is defined as a section which is drawn along the section line. Cross sections are a series of sections drawn at regular intervals, perpendicular to (across) the section line.
Long sections are particularly useful for the interpretation of landforms. Traditionally they have been relatively easy but time consuming to produce. TERRA-FIRMA allows you to create long sections from contours or from a .KGM file almost instantly. Sections are drawn using standard AutoCAD drawing objects so they can easily be enhanced with annotation or illustration after TERRA-FIRMA has drawn them.
Overview
Drawing a Long Section with Key TERRA-FIRMA is a simple 3-step process.- Draw the section line in plan using the "Polyline" command.
- Use one of the create section commands to write the section data to a file.
- Use the "Draw Section" command to draw the section in the AutoCAD drawing window.
Before you can draw a long section, you must either have some object base-data or you must create a ground model from your data. The "2D Polyline and 3D Polylines" command can use contours to generate section data and the "Create Long Section" command uses a ground model file (.KGM). If you have not previously created a ground model or your memory needs refreshing, see the "Ground Modelling" tutorial. If you already know how to create a ground model but have no data to work with, see the Sample Data section below.
TERRA-FIRMA provides a wide range of options for creating and working with sections. Many of these options are designed for civil engineering and go way beyond what most people require. This tutorial is designed to demonstrate the quickest and simplest way to draw a section. Feel free to explore the many other options when you have gained the basic skills.
Download Sample Data
If you have no contour data to work with you may like to download a sample file so that you can follow the live tutorial. Click on the icon below to download the AutoCAD drawing file gm-base.dwg. Even if you have your own contours you may like to use this file for the purposes of the tutorial before you start work with your own data. There are two download options, you can either download the native AutoCAD drawing file or you can download the smaller compressed version. The Zip file can be uncompressed with a utility such as WinZip.The drawing file is approximately 2km x 2km square and contains two sets of contours on different layers. The contours are at 5m intervals in the range 175m to 395m with index contours drawn at 25m intervals.
Drawing a Section Line
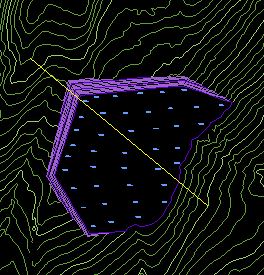 The first part of the process is very simple. Open the gm-base drawing and draw a section line similar to the one in the illustration below. Section lines are best drawn in plan view so that you can accurately position them. Section lines must be drawn using the Polyline command,
 Creating a Section from Contours
| Toolbar | |
| Pull-down | Key T-F |
| Keyboard | none |
 The "2D Polyline and 3D Polylines" command can be used to create a section file (.SEK) using a 2D polyline (representing the section line) and some 3D Polylines or 2D Polylines with elevations (representing contours). No ground model is required, the section data is extracted directly from the contours and written to file.
Before starting the command, use the Layers command,
Command Sequence
Command: (start the command from the Section toolbar or the pull-down menu)Programs loaded, starting…
Select reference string (polyline)
Select objects: (pick the section line)
Select objects:
String Long Section creation
Include 2D Polylines (Contours)? Yes / <No>: Y (you must enter Yes to this prompt)
Select Polylines…
Select objects: (pick all of the contours which cross the section line)
Tip: Use the Fence selection method, see the "Object Selection" tutorial for details.
Select objects:
The Write Section File dialogue box now appears.
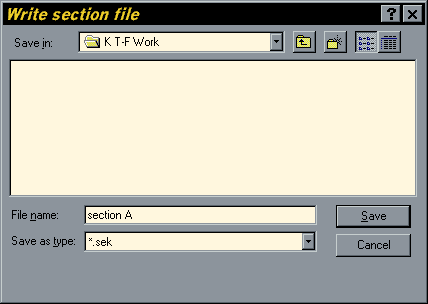
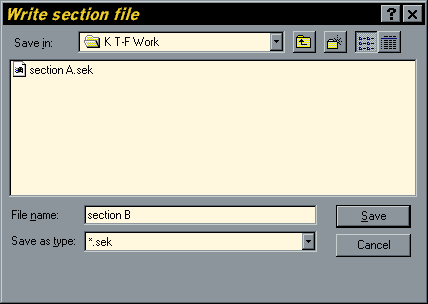
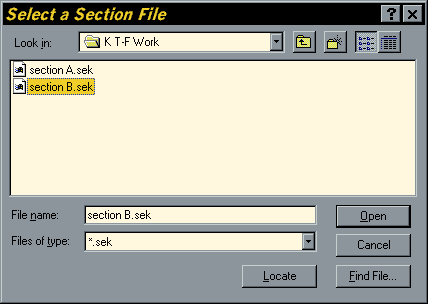
The Write Section File dialogue box works in the same way as all of the general file dialogue boxes. First of all, make sure that the folder where you want the section file to be created appear in the "Save in" field at the top of the dialogue box. If it does not, use the drop-down list to navigate your way to your preferred folder. Then, simply type the name you have given to this section file in the "File name" edit box. Notice that the "Save as type" edit box already displays the default "*.sek" file extension, so you do not need to explicitly enter this. Give your section file a meaningful name such as "section A", so that you can easily identify it later. Your dialogue box should now look similar to the one above. Click the "Save" button to continue.
 TERRA-FIRMA writes section data to file, rather than simply drawing the section, for the same reason that it writes ground model data to file. Although the .SEK files can be used to draw sections, they can also be used for other operations, and you may want to draw section lines more than once. So, although it may seem an unnecessary step, it does give lots of flexibility. Since section files are simple text files, they are also incredibly portable and can be sent to colleagues or clients who can then create sections of their own.
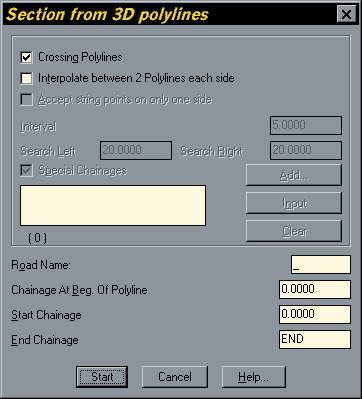
Once you have specified a file, the Section from 3D Polylines dialogue box appears. This dialogue box enables you to define how TERRA-FIRMA gathers the data which will be used to create the section. At the top of the dialogue box you will notice that the "Crossing Polylines" option is checked. This means that section data will be extracted from each intersection point between the section line and the contours. In situations where there is lots of contour data, as in our example, this option alone will create acceptable results. If contour data is sparse or irregular, you can use the "Interpolate between 2 Polylines each side" option to generate more data where more contours exist either side of the section line. The "Search Left" and "Search Right" options can be used to tell TERRA-FIRMA how far to look for more contour data. The "Accept string points on only one side" option can be used to generate more data where contours appear on only one side of the section line. However, in such circumstances, better results will probably be achieved by creating the section from ground model data. See Section Data Generation Options, below for more information on these options.
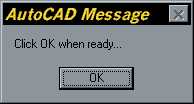 Make sure that only the "Crossing Polylines" option is checked and click on the Start button to write the section data to file. The extent of the calculated section is shown in red along the section line and the AutoCAD message shown on the right appears. Visually check the red section line to make sure that it is what you expected and then click the "OK" button to complete the command.
Section Data Generation Options
The illustration below shows a section line (white) drawn through an area where contour coverage is uneven. The different coloured data points indicate which options in the Section from 3D Polylines dialogue box are used to generate them. See below.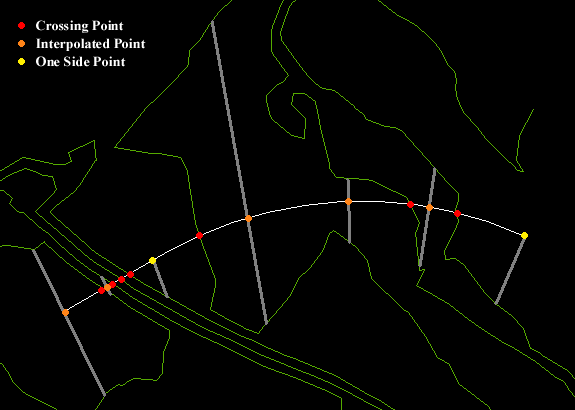
Data points marked with red dots are those generated by the "Crossing Polyline" option. You can see that in each case, the section line intersects a contour. The orange data points are generated using the "Interpolate between 2 Polylines each side" option. In each case, a perpendicular line (grey) runs between contour lines which appear on either side of the section line. The frequency of these perpendiculars can be set using the "Interval" option in the dialogue box. The calculated height value is a function of the two contour values and their relative distances from the section line. This method of calculation is known as interpolation. Finally, the yellow data points are generated using the "Accept string points on only one side" option. This is the least reliable method for accurate data generation since it relies only on single contours where no interpolation is possible.
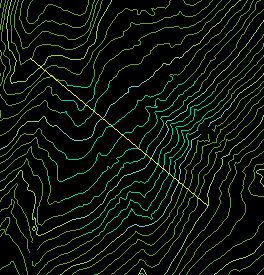
The Drawn Section

When you have drawn the section, using the section file you have just created, it should look something like the illustration above. See Drawing the Section to find out how this is done.
Creating a Section from a Ground Model
| Toolbar | |
| Pull-down | Key T-F |
| Keyboard | none |
Before starting this command, you must have a ground model file (.KGM) to work with. If you have already worked through the Volumetrics tutorial, you should have a file called QUARRY.KGM. You can use this file to follow the section below. You may need to use the Release all Triangles command to make the whole ground model active. If you have not worked through the Volumetrics tutorial, you will need to create QUARRY.KGM from the sample data before proceeding. See Creating the Ground Models for step by step instructions. Do not specify any active/passive zones.
Command Sequence
Command: (start the command from the Ground Modelling toolbar or the pull-down menu)Arc/Circle drape resolution is 5.00 degrees - use KTFC to change.
Programs loaded, starting…
Ground Model Long Section
Select reference string (polyline)
Select objects: (pick the section line)
Select objects:
The Ground Model Selection dialogue box now appears.

Use this dialogue box to select the ground model file (QUARRY.KGM) and then click on the "OK" button. If the file does not appear in the "Ground Models" window, navigate your way to the folder where your ground models are stored using the "Directories" window. Notice that the ground model information is displayed in the "Selected Ground Model Info" section of the dialogue box when the file is highlighted.
Once TERRA-FIRMA has read the ground model data, the Write Section File dialogue box appears. Use this dialogue box to specify the name and location of the new section file. Type the file name "section B" in the "File name" edit box and click on the "Save" button.
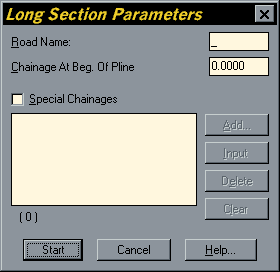 After entering a filename for the section file, the Long Section Parameters dialogue box appears. This dialogue box allows you to specify a "Road Name", a start chainage and to define "Special Chainages". These options are primarily to do with road design and need not concern us here. Simply click the "Start" button to write the section data to file.
It is perhaps worth mentioning that the word "Chainage" refers to the distance along any datum line (in this case the section line although it is most commonly used with reference to road centre lines). "Special Chainages" are points along this datum which need to be annotated in some way. The word seems to derive from the "Engineers Chain", a unit of measurement equalling 100 feet.
If you have been following this tutorial from the start, you should now have two section files. section A, created with the "2D Polyline and 3D Polylines" command and section B created with the "Create Long Section" command. Follow the next section of this tutorial and find out how to use these files to actually draw the sections.
Drawing the Section
| Toolbar | |
| Pull-down | Key T-F |
| Keyboard | none |
Start the command by clicking the button on the Sections toolbar or select the option from the pull-down menu. The Select a Section File dialogue box appears. Use this dialogue box to select the section file which represents the section you want to draw. If you are following the tutorial, select the section Bfile and then click on the "Open" button.
 As soon as the section file is selected, the Long Section Drawing Options dialogue box appears. This dialogue box is used to control the way the section line is drawn.
The first thing you may want to do is give the section a title. If you look at the "File Information" section of the dialogue box, you will notice an edit box entitled "Reference". TERRA-FIRMA automatically enters the section file name to be used as the section title. However, you can enter any text you like, providing it is no more than 20 characters in length. This text will appear below the drawn section line as a title, see illustration.
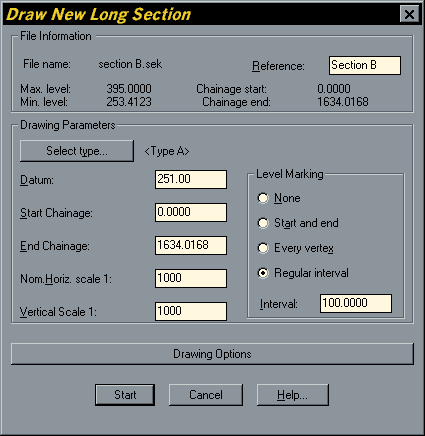 There are a number of options in the Drawing Parameters section of the dialogue box which are worth considering. The "Datum" option allows you to set the elevation of the section datum or base line. The datum default is calculated as being 2m below the integer "Min. level" value. You may want to set the datum to a more obvious value, such as "250". Changing the datum is particularly important if you are creating a number of sections which will be visually compared. In such a case, all your sections should have a common datum.
You will not normally need to modify the Start and End Chainage values. These simply indicate the calculated length of the section. You would change these values if you wanted to draw only part of the section. For example, if you wanted the drawn a section starting 500m from the start point and 1000m long, the Start Chainage value would be set to 500 and the End Chainage value would be set to 1500.
The "Nominal Horizontal Scale" value basically controls the text height which is used when the section is drawn. Essentially, this value represents the plotting scale. Entering the intended plot scale ensures that all text will be readable when plotted at that scale.
The "Vertical Scale" option determines whether the section is drawn with vertical exaggeration or not. When the vertical scale is set to the same value as the nominal horizontal scale, there will be no vertical exaggeration and the section will be drawn at natural scale. If you want to apply an exaggerated vertical scale to the drawn section, you must work out the ratio of the two scales which will give the correct scale factor. For example, if the nominal horizontal scale is set to 1000 and you want to draw the section with 5 times exaggeration, the vertical scale would need to set to 200. This figure is arrived at simply by dividing the nominal horizontal scale by the required scale factor.
 For the purpose of this tutorial, set both the Nominal Horizontal Scale and the Vertical Scale values to "1000". This will generate a natural scale section with legible text when plotted at a scale of 1:1000.
The "Level Marking" section of the dialogue box is used to control whether levels are marked along the section and how often they appear. If you are following the tutorial, set levels to appear at regular intervals and set the interval to 100. This means that the drawn section will be annotated with levels every 100m.
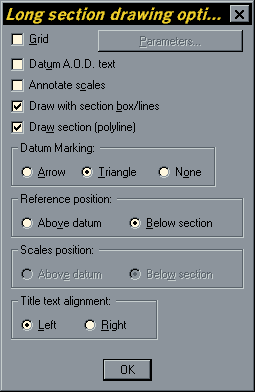
Finally, click on the Drawing Options button to display the Long Section Drawing Options dialogue box. This dialogue box is used to control which section components are drawn. The options are fairly self explanatory and you can experiment with them to see how they affect the final result. To follow the tutorial, check only the "Draw with section box/lines" and "Draw section (polyline)" options. The dialogue box should look like the one in the illustration. Click the "OK" button and then the "Start" button on the Draw New Long Section dialogue box. The command line then prompts:
Position long section
Pick the lower left hand point where you want the section to be drawn. When the point is picked, the section is automatically drawn and the command ends. Your drawn section should look similar to the one in the illustration below.

Now try drawing another section using the section A file and compare the results with the illustration of Section A shown earlier in this tutorial.
Cross Sections
Cross sections are created using exactly the same methodology as for long sections. The only difference is that the user must also define the frequency and offset of the cross sections along the section line. Cross sections can be created from contours using the Cross Sections from 2D Polyline and 3D Polyline command,Creating a Cross Section from a Ground Model
| Toolbar | |
| Pull-down | Key T-F |
| Keyboard | none |
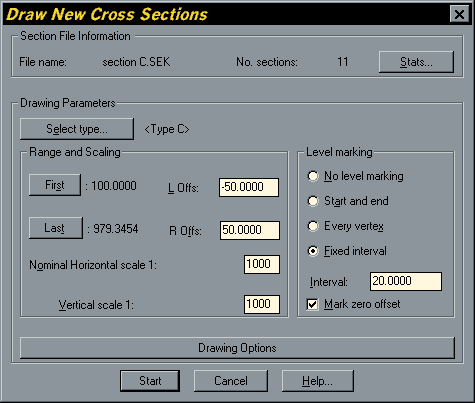
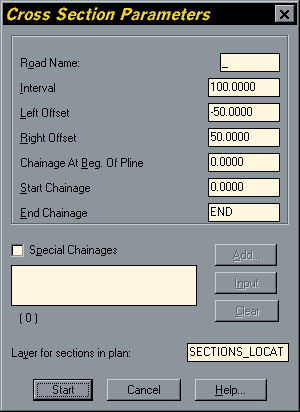 a section file name in the Write Section File dialogue box. After entering a file name, click on the "Save" button. The Cross Section Parameters dialogue box appears, shown on the right. This dialogue box is similar to the Long Section Parameters dialogue box except that it requires the additional parameters of "Interval", "Left Offset" and "Right Offset" to be specified.
The interval represents the distance between cross sections along the section line. For example, if the section line were 900m long and you set the interval to 100, the result would be 9 cross sections. Cross sections are arranged along the length of the section line with the first one located at the first vertex of the polyline and then at equal intervals. The last cross section is always drawn through the last polyline vertex, so that the interval between the last and penultimate cross sections may not be equal to the specified interval.
The left and right offsets are used to determine how far either side of the section line the cross sections extend. In most circumstances you will probably want the left and right offsets to be the same, however, TERRA-FIRMA offers the option of making them different. The left offset extends to the left of the section line when looked at from the first vertex to the
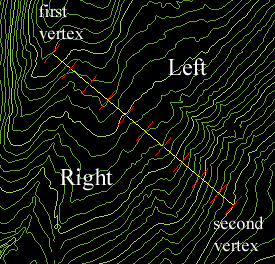 second vertex. In other words, the orientation of the section line is determined by the direction in which it was drawn. Consequently, the right offset extend to the right of the section line when looked at in the same orientation. Notice that the left offset value must be negative.
When you have set appropriate values for the interval and the offsets, click on the "Start" button to write the cross section data to file. When the process is complete, TERRA-FIRMA draws the cross section lines along the section line so that you can see where they have been created (see illustration).
The process of creating cross sections is very similar to that of creating long sections, save for the differences outlined above. If you would like a more detailed account of the process, see Creating a Section from a Ground Model.
Drawing Cross Sections
| Toolbar | |
| Pull-down | Key T-F |
| Keyboard | none |
In the "Range and Scaling" area of the dialogue box you have the opportunity to clip the left and right offsets of the cross sections by reducing the offset values. The default values are set to the actual offsets you specified when the cross sections were created. This may be useful if, for example, you set left and right offsets to say 100 when the sections were created and you want to draw sections with only 50m offsets.
 In the same area of the dialogue box, you also have the opportunity to prevent particular cross sections from being drawn. If you click on either the "First" or "Last" buttons, you will be presented with the Chainages in the Section File dialogue box, which lists all of the cross sections (illustrated on the right). You can prevent any section from being drawn by highlighting it in the list and clicking the "Exclude" button. The excluded section is prefixed with an "E" in the list. To reactivate an excluded section, simply highlight it and click the "Exclude" button again. This little dialogue box is also useful because it tells you how many points are being used to draw the section and this gives some indication as to the reliability of the drawn sections.
The other options in this dialogue box and those displayed by clicking the "Drawing Options" button are described under Drawing the Section. When you have specified all of the necessary parameters, click on the "Start" button to begin the drawing process. TERRA-FIRMA prompts:
Position first cross section
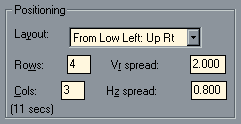 By default, the first cross section will be drawn in the lower left hand position, so make sure, when you pick the point, that there is plenty of space above it and to the right of it. The eleven sections in this example are drawn in four rows and three columns. This arrangement is the default but you can always specify a different arrangement and layout using the appropriate parameters in the "Positioning" area of the Cross Section Drawing Options dialogue box.
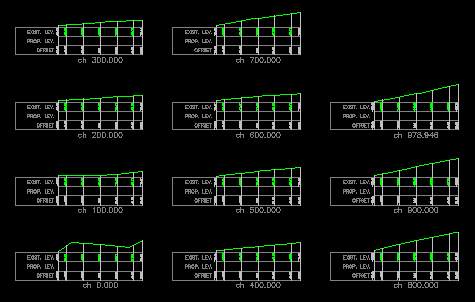
Your drawn cross sections should look something like the ones in the illustration above. Each one is labelled with a chainage value so that you can easily identify its position along the section line. As you can see, the cross sections are drawn from bottom left to top right. The first one being drawn at chainage 0.000 and the last one at 978.946.
Tips & Tricks
- You can vastly speed up the process of drawing long sections and cross sections with the TERRA-FIRMA "Quick Draw" function. To use the Quick Draw function, simply enter "D" at the keyboard immediately after creating the section file. You are prompted to pick a start point. When a point is picked, TERRA-FIRMA draws the long section or cross sections using the default drawing parameters.
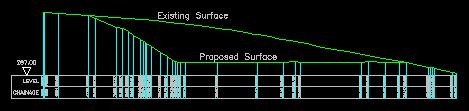
- TERRA-FIRMA sections are drawn using simple AutoCAD objects so it is quite easy to use them in various ways. For example, you may want to compare section lines generated along the same section line but from different ground models. You can do this quite effectively by copying one section on top of another to give a composite section (see illustration). The advantage of this is that it will also show the area of cut or fill between the two section lines.
 This process can also be automated using the Superimpose Section command,
  from the Sections toolbar or KT-F
 SectionsSuperimpose Section from the pull-down. Draw one section first and then use the command to superimpose a second section.
 - Many TERRA-FIRMA functions rely on the direction in which polylines are drawn. The Create Cross Section command is just one of them. Sometimes it may be necessary to reverse the direction of polylines. You can do this using the Reverse Polyline function. You will find this on the pull-down menu, KT-FGeneral Polyline utilitiesReverse polyline direction.
- When a section is drawn, TERRA-FIRMA automatically creates some new layers for the various section components. Objects drawn on these new layers have their colour set "ByLayer" so it is quite easy to change the colours if required. See the "Object Properties" tutorial for details.


0 comments:
Post a Comment