This Basics tutorial is to explain how to build faces and the three uses of the bridge tool that make it very very useful!!!! Creating faces using the CREATE POLYGON tool is accurate and used most often but can be slow at times, the BRIDGE tool allows you to fill in faces very quickly, you can also bridge gaps between two parts or cut a clean hole through an object..Read on!
BUILDING FACES
OK first off create a new polygon object as shown, it will just be a blank object ready for points and faces to built into it. 1. click POINT MODE, 2. make sure your on the MOVE TOOL, 3. HOLD down CTRL and left click in a window to add points. This allows you to start adding points that the faces will be built from.....
1. Still in POINT MODE, 2. Click STRUCTURE and 3. select CREATE POLYGON, this sets it in face building mode
OK to build faces you click CLOCKWISE, 1,2,3,4 and 5 back to the first point to create the face, (if you build the faces anti-clockwise they will face the other way) Its also better to build quads (two flat triangles that make up a four sided poly) as its better for smoothing etc afterwards, but you dont have to and sometimes you cant :) tri's are OK here and there but try to work in quads. You can also select say 1-10 (for example) points and it will build all the faces how it thinks its best to but I prefer to control exactly where I put the faces....

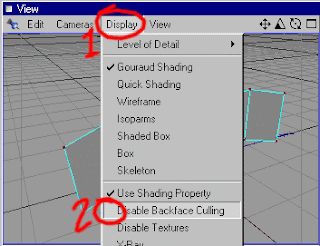
The other thing I wanted to mention was to Untick (turnoff) DISABLE BACKFACE CULLING, this is vital so you can see which way faces are facing, if they are facing away they are invisible (shame you cant colour backfaces??) anyway its best to work mainly in this mode especially for lowpoly modelling otherwise when you export the model you'll find it has holes (faces facing the wrong way) etc.....OK onto the faster way of building faces...THE BRIDGE TOOL
THE BRIDGE TOOL - PART 1 - BUILDING FACES
OK same again, 1. create a new polygon object and add some points using CTRL and click, 2. select STUCTURE, 3. and select the BRIDGE TOOL or instead just press "B" to enter BRIDGE mode.
OK click and hold 1 and drag to 2, click and hold 3 and drag to 4. WOW instant face now carry on dragging from bottom to top and you can whack in a load of faces in a few seconds, press ESCAPE (to break off face building) when you get to the end and start from the beginning of the next row below and fill in another row of faces, very fast way of building faces this is. If I had dragged from top to bottom the faces would have faced the other way.....
THE BRIDGE TOOL - PART 2 - BRIDGING A GAP
OK the next thing the BRIDGE tool can do is join to things together. 1 I created 2 boxes and made them EDITABLE, I then selected them both and 2. clicked CONNECT to join them into one object, this creates a new object, so select the original seperate two objects and delete them leaving the single object made of 2 boxes....the objects have to be CONNECTED (not joined) to bridge the gap between....
1. OK in FACE mode, 2 I selected the two inner faces and 3. press K to use the KNIFE tool and 4 and 5 I KNIFED two lines here to create some more detail on the inner faces. 6 as you can see here both boxes are in one object...
1. Still in FACE mode I selected the 2. two faces I wanted to BRIDGE between and I also select 3. XRAY mode so we can see through it...also when I switched off DISABLE BACKFACE CULLING ealier well that needs ticking back on again otherwise you cant see the backfaces :)
OK click and drag from 1 to 2 as shown and there you go the gap is bridged and inner faces get autodeleted, it doesn't have to be square can be any shape although I think both ends of the bridge need to be identical....not sure gotta try that out :)
THE BRIDGE TOOL - PART 3 - CUTTING A HOLE
OK the third thing the BRIDGE tool can do is create a hole through an object sometimes a lot cleaner than a BOOLEAN. 1. select FACE mode and select both sides of a box, 2. KNIFE across to get it divided up...
1. Still in FACE mode select just the faces at the end on both sides, 2. press "I" to EXTRUDE INNER and drag it in a bit.
1. Faces still selected in FACE mode, press "B" for the BRIDGE tool and drag from 2 to 3 to instantly create a hole through the object. 4 also tick XRAY before you do all this so you can see where to drag from and to!!
I dropped it into a HYPERNURBS object and you can see its smoothed with a hole through the end, as you can see the BRIDGE tool has many uses!! I hope you guys out there find this stuff useful, if you do stop byhttp://www.psionic3d.co.uk and drop by the forums with the rest of us 3D/4D maniacs ;)


0 comments:
Post a Comment